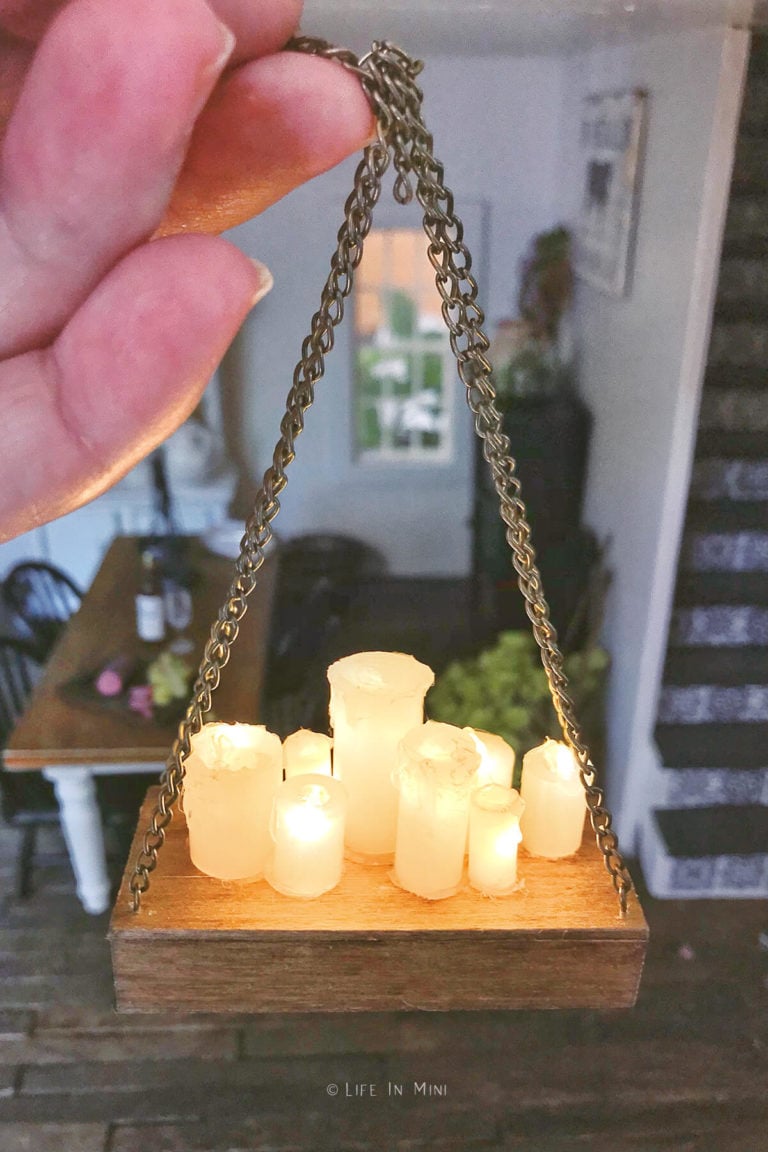
Upgrade your dollhouse lighting by making your own battery operated rustic dollhouse chandelier with candles. This DIY chandelier is made with inexpensive items you can find at the dollar store or hardware store.
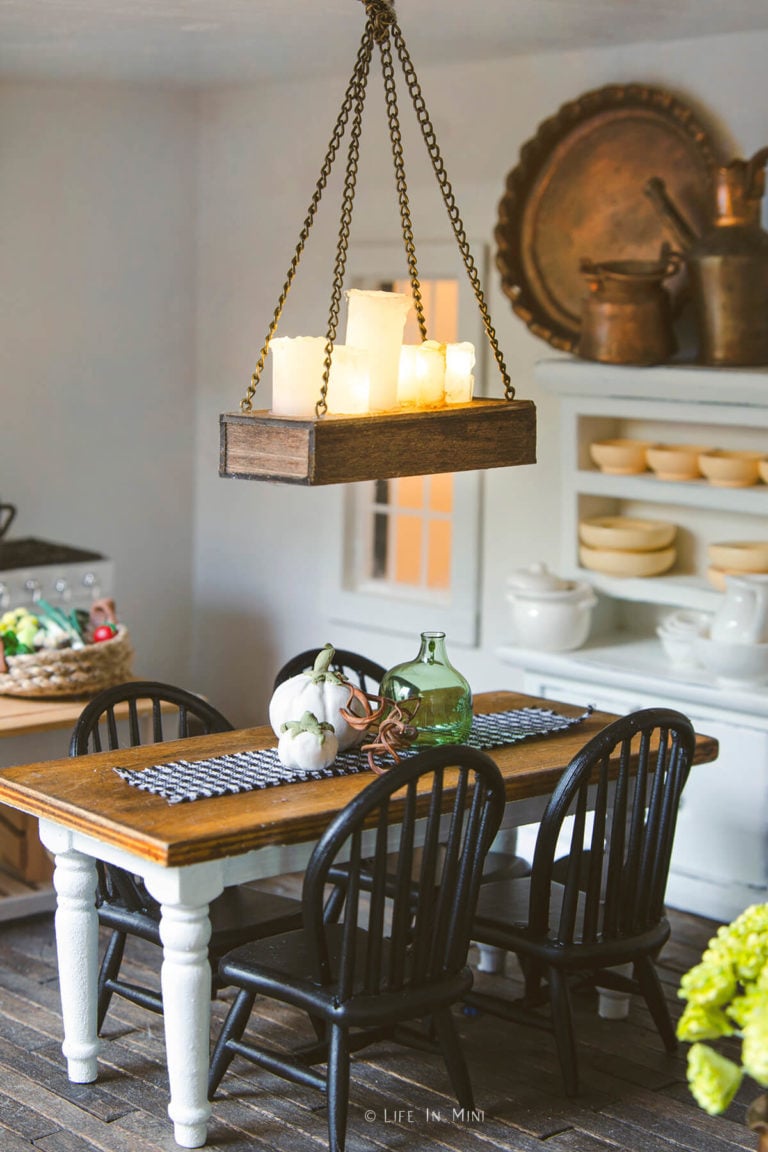
Yup, I’m still working on the downstairs! I can’t seem to move past this part of my dollhouse. I’m really loving to how it is coming together, albeit super slowly.
There is a terrific community of miniature lovers on Facebook and Instagram. You can find a lot of great tips on making your own miniatures, not to mention a lot of super crazy talented artists.
I do not have a 3D printer (yet) or a laser cutter (yet). I did invest in a Cricut Maker since I can’t cut wood straight even if my life depended on it. My husband has a garage full of tools, but I don’t feel comfortable using them to cut miniatures.
So, I slowly make what I can, buy a few one-of-a-kind pieces, and scour the internet to learn what I don’t know. It was in one of these groups where I learned how to make a miniature candle using cheap fairy lights.
I have made real miniature candles, but not electrical ones. The base of the candles are made using these inexpensive nylon spacers. I had some bamboo drinking straws that I thought looked like pillar candles, but they came in one diameter and were a bit thin.
Anna is on instagram (Little House of Lights) and she shared this tip about using nylon spacers for the candles. I had always wanted this gorgeous candle chandelier from Restoration Hardware, but didn’t have the $1000+ to have it in real life.
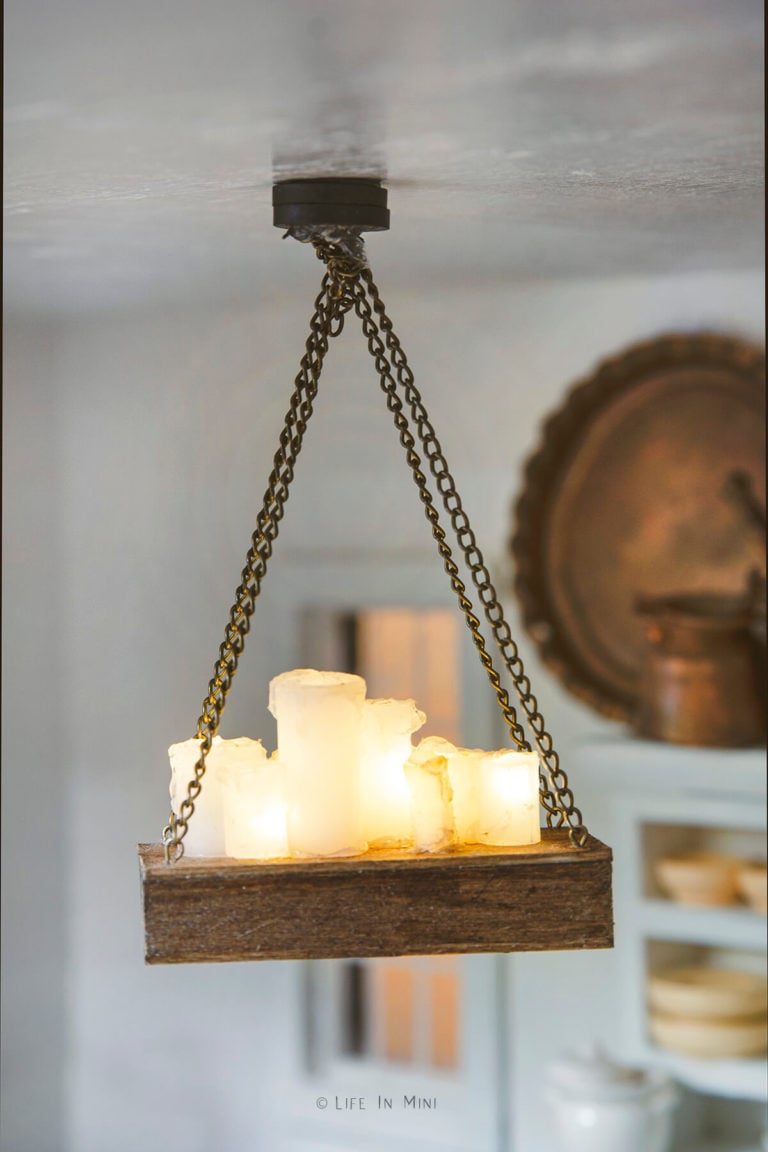
So I decided that my dollhouse would get this beautiful chandelier. And now I found a way to make it myself on the cheap. If you haven’t noticed, purchasing a miniature chandelier can cost a small fortune.
Ugly battery operated ones made of plastic cost about $15. Nicer dollhouse chandeliers can cost $50 and higher. My light cost me about $10 for the fairy lights, nylon spacers and wood. I already had everything else.
I did pay more technically, but I received a lot of extra pieces that I did not use for this one light fixture (i.e. a pack of 6 fairy lights where I only needed one strand). Now that I have made my first battery operated battery chandelier, I know I will build more with my extra parts- and without having any fancy wiring skills.
This was a very challenging build for me on a few levels. I go into more detail in the directions below. I will probably remake it and shoot a video. But until then, I hope these directions answer all of your questions.
You can make this for 1:12 or 1:6 dollhouse. Smaller scaled houses will require smaller nylon spacers. See my Dollhouse Chandelier Story for a quick visual guide to making this recipe.
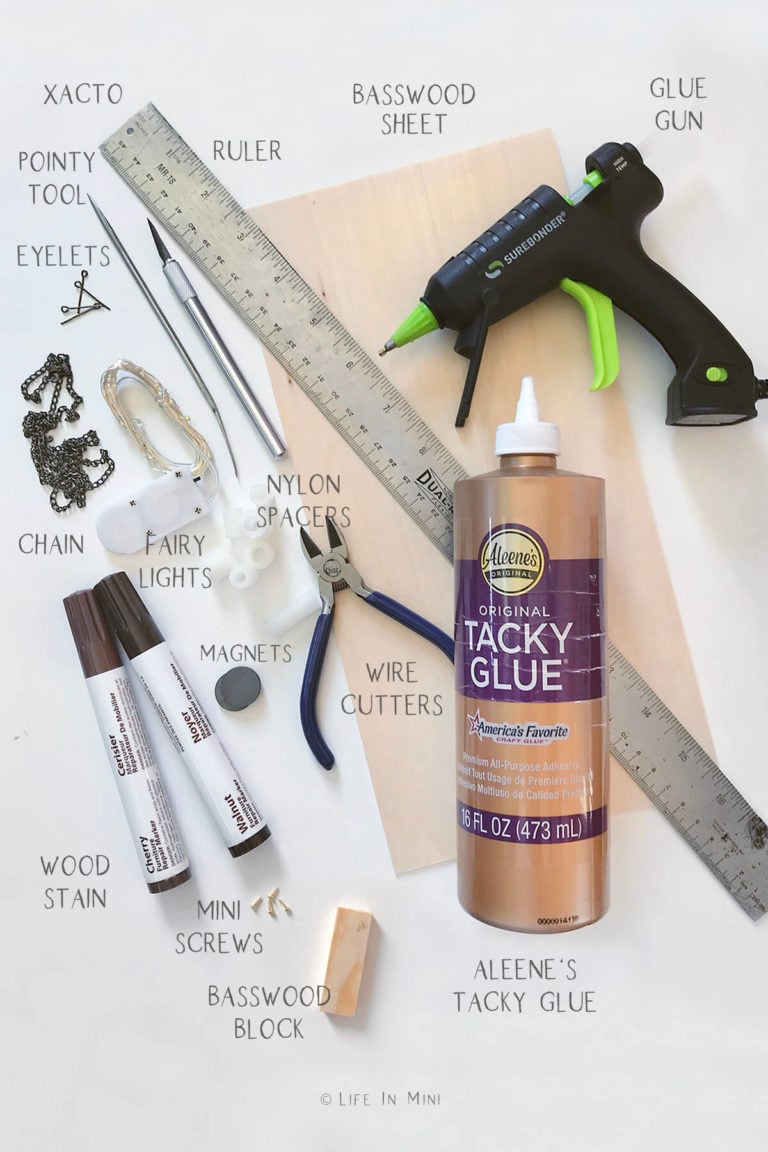
Supplies you need
This post contains some affiliate links for your convenience (which means if you make a purchase after clicking a link I will earn a small commission but it won’t cost you a penny more)! Read my full disclosure policy.
- Wood: You will need a thin sheet of basswood to make the box for the chandelier. I used Cricut’s 3mm basswood since I was cutting it with my Cricut Maker. You will also need small blocks of basswood for the screws to go into. Balsa wood will not work. You could use chipboard to make your box, but note that the measurements I provide are for 3mm basswood.
- Nylon Spacers: You can find these nylon spacers at hardware stores and online. At Home Depot, they were stored in drawers in the hardware section. They come in a variety of sizes and thicknesses. The ones I feature in this tutorial were purchased at Home Depot. The larger pieces are about 80¢ each, smaller pieces 2/$1. Online is definitely a better deal with 150 pieces for $10 (7¢ each).
- Fairy Lights: Some people found these fairy lights for $1 at The Dollar Tree. I could not find them, so I ordered these warm white fairy lights on Amazon, 6 for $8 ($1.33 each). You can also find them cheaper. These are powered by two CR2032 Lithium Coin Cell Batteries that you can purchase in bulk on Amazon for 10 for $8 (80¢ each).
- Jewelry chain and eye pins: To secure the mini chandelier, I used some inexpensive jewelry chain that my kids never used. They were attached to the wood box using eye pins.
- Magnets: To secure the chandelier to the ceiling, I used cheap Dollar Tree magnets like these.
- Mini screws: You will need small screws to secure the bottom of the box of your chandelier. I used wood screws #0 x ¼. My husband found them at Marshalls Hardware, but I think these are the right ones on Amazon.
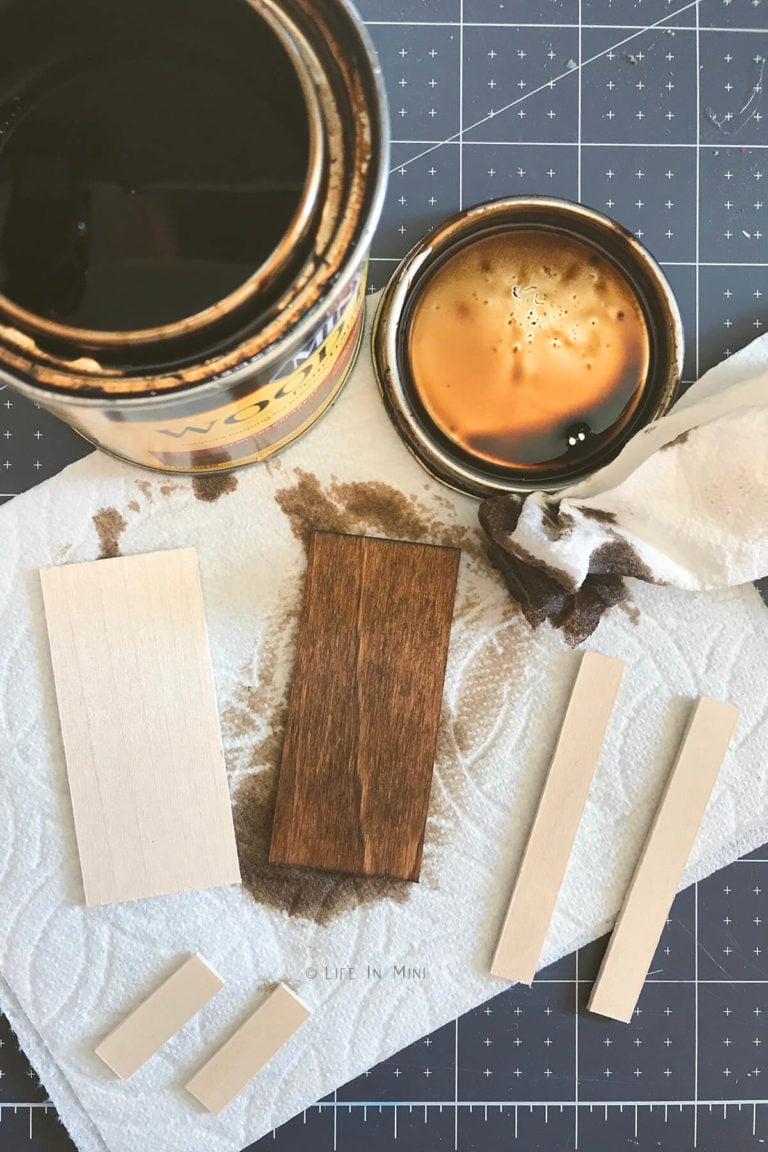
- Wood stain: I used Minwax Provencial 211 to stain my wood box. Feel free to use whatever stain or paint you like, or leave it natural.
- Glue: I used both Aleene’s Tacky Glue and hot glue.
- Other tools: You will need wood cutters to cut your basswood (if you are not using a Cricut Maker like I did). You can use an xacto or mini drill (electric or manual) to cut the round holes and slit. You will also need a ruler, sand paper, wire cutters and small pliers.
Step-by-step directions
1. Using your preferred cutting tools, cut the basswood to form your box. I cut mine using my Cricut Maker. I have the free SVG file if you want to use my dimensions (I also have a free PDF with a template and exact sizes listed). You will need two big rectangles (3.175cm x 6.985cm) for the top and bottom plus the 4 thin sides (2 at 1cm x 6.985cm and 2 at 1 cm x 2.8575cm).
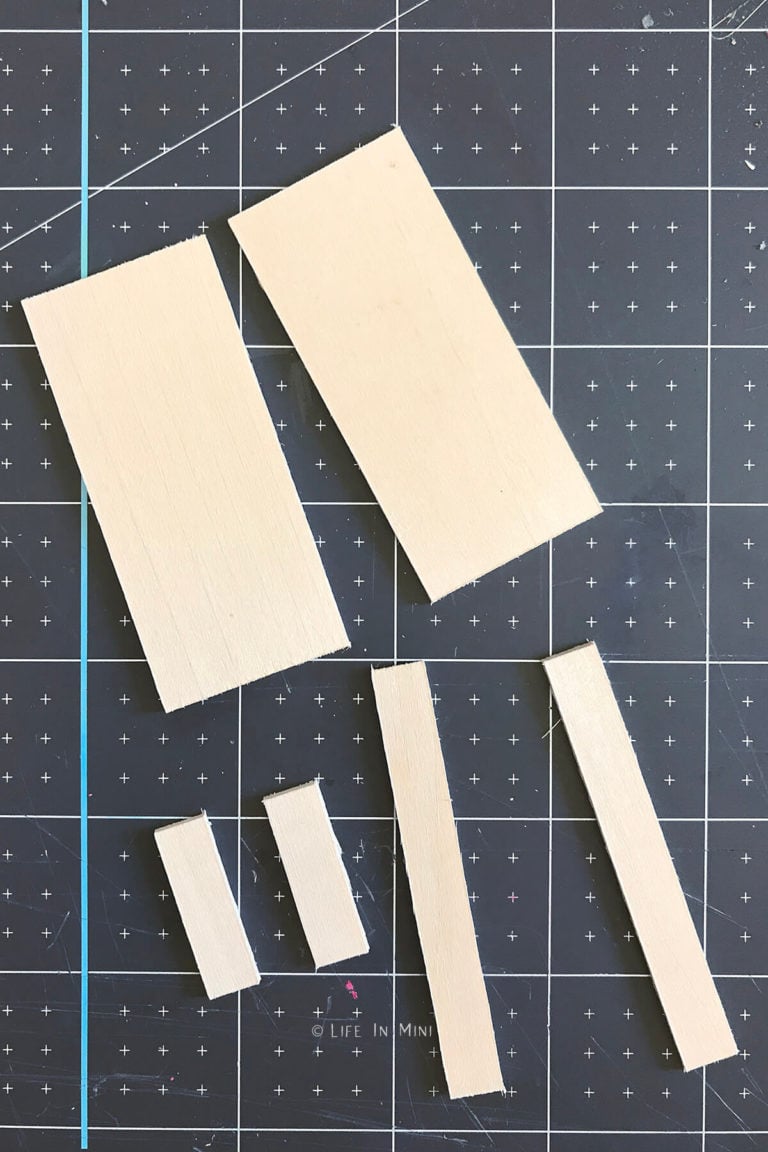
2. Sand the wood pieces smooth, then stain or paint your wood pieces to desired color. Let it dry completely.
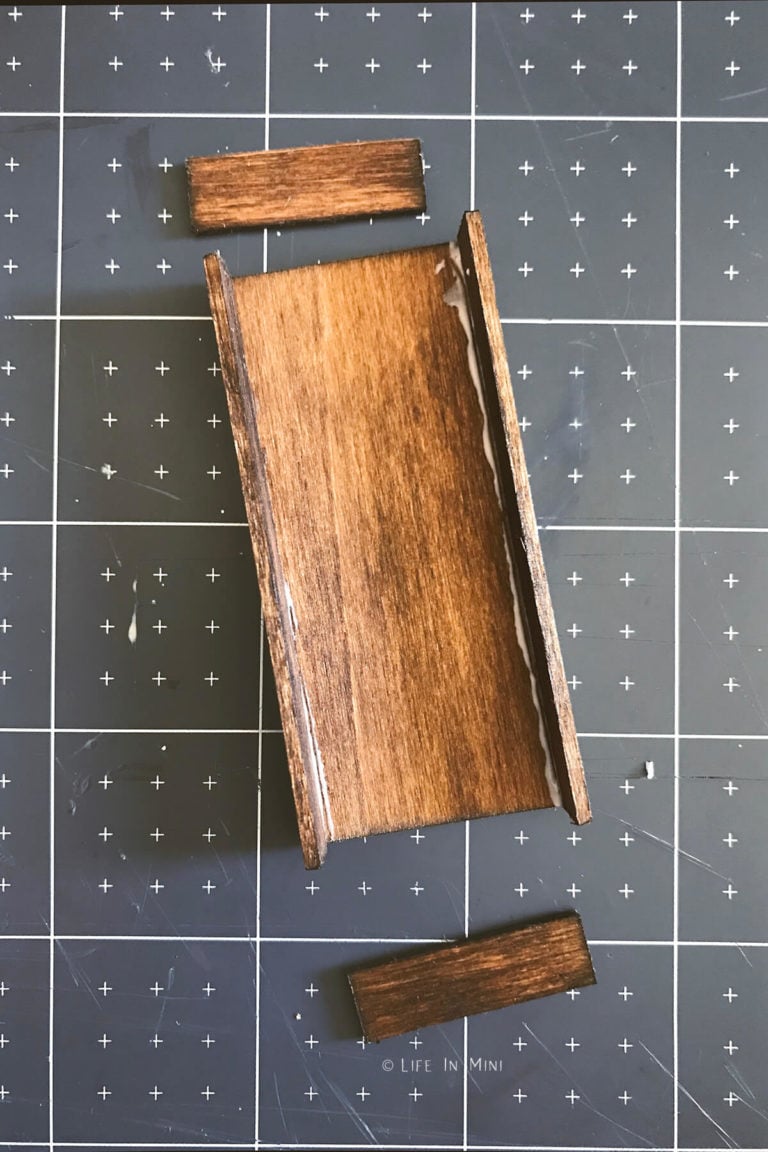
3. Glue the sides to the top wood piece using wood glue or Aleene’s Tacky Glue and let it completely dry.
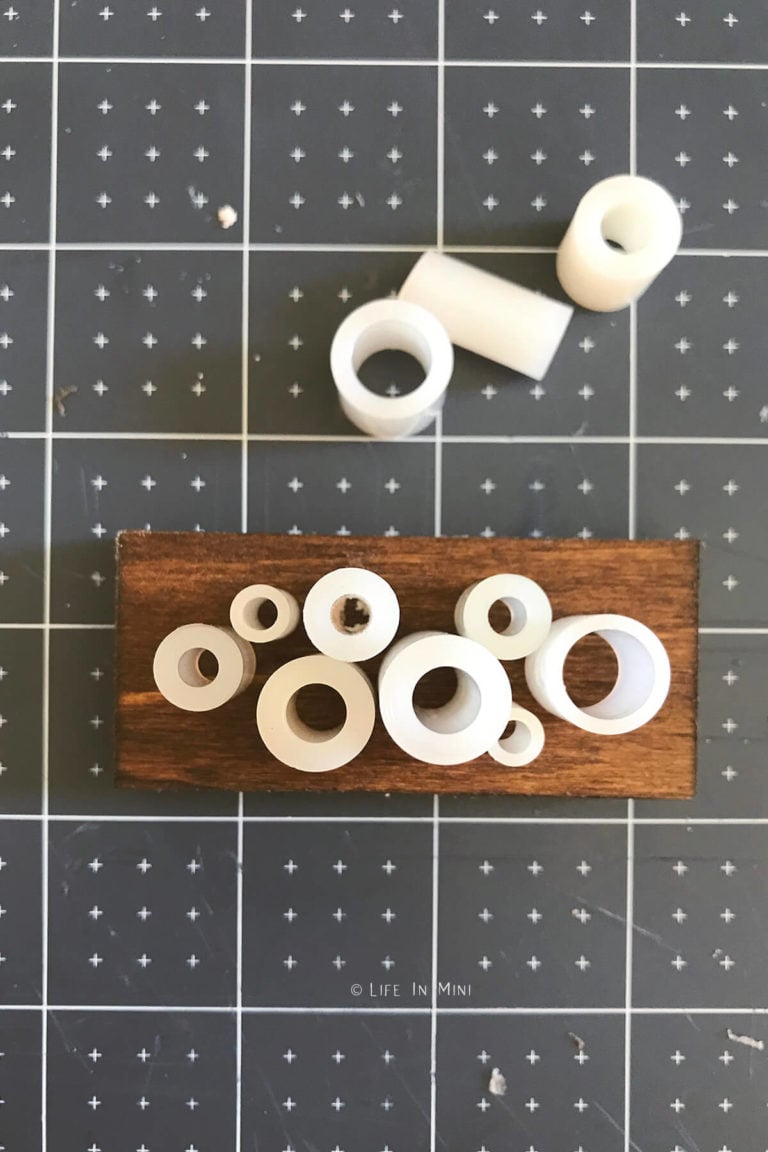
4. Position your nylon spacers onto the top piece into an arrangement you are happy with. I positioned the taller pillars in the center and surrounded them with shorter pillars of various sizes. Using the tip of an xacto knife or a pointy tool, mark an indentation in the center of each nylon spacer. I also dipped my pointy tip into white paint and used that to mark the drill holes.
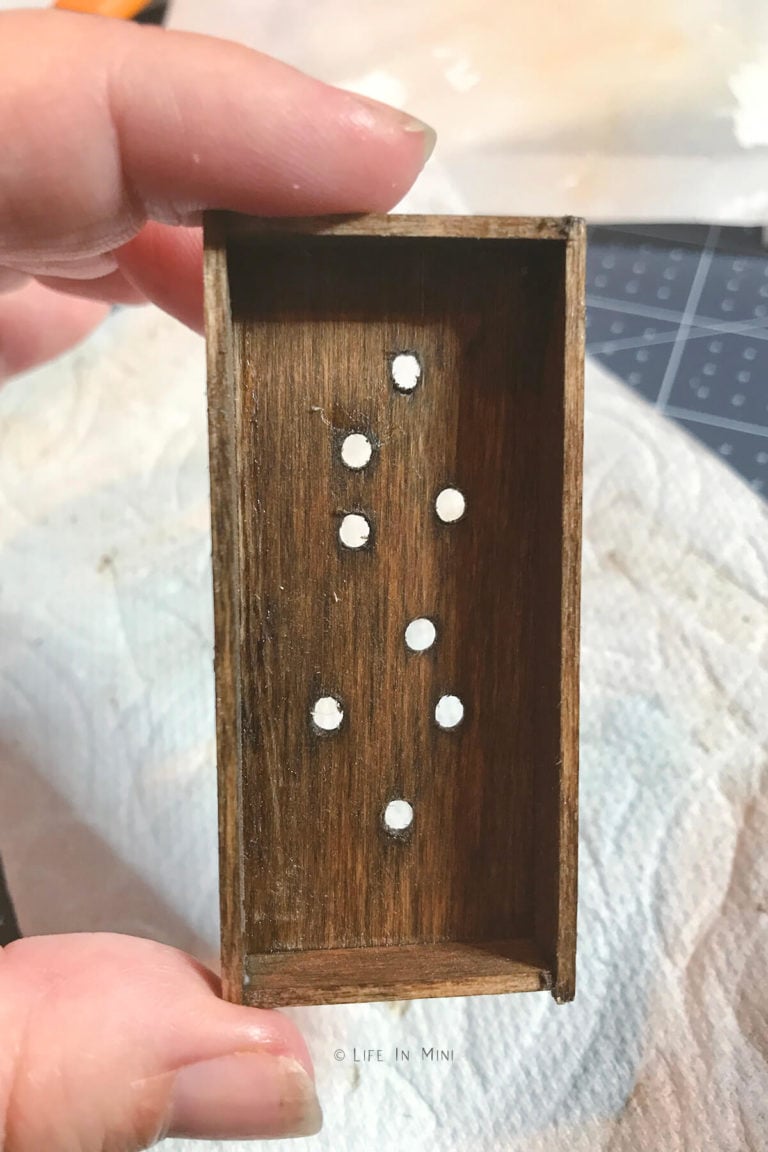
5. Take a picture of your arrangement or place the spacers on your workspace in the arrangement you have selected. Using a small drill, carefully drill small circles where the indentations are. You will need a 3mm circle to accommodate for the fairy lights to pass through. The basswood can split during this process so be careful, speaking from experience! I ended up cutting my circles with my Cricut Maker when I first cut the rectangular pieces. This is also available in my free svg file.
6. Now let’s work on the fairy lights. The ones I bought have 20 lights on the strand. I only need 8 lights for this chandelier. So using wire cutters, cut past the 8th light using about half the wire after the light. Starting with this last light, fold the wires on each side and twist together. Continue folding and twisting the wires for each light on the strand.
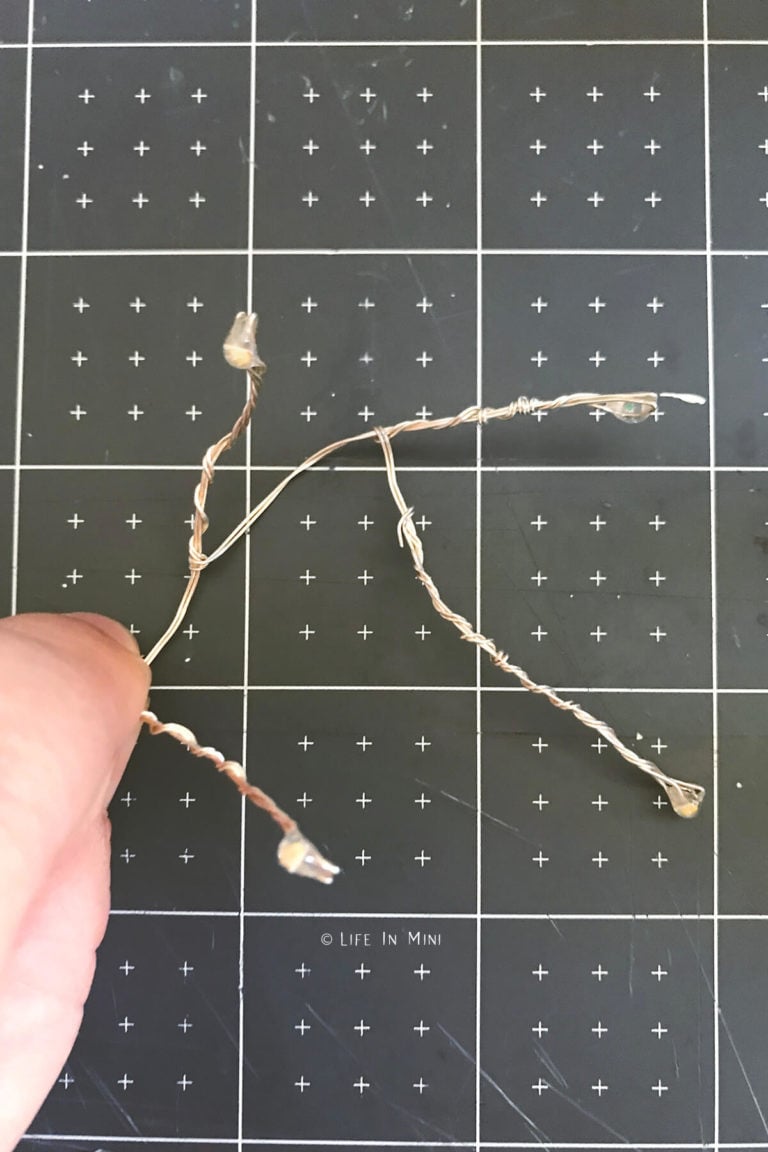
7. Starting with the first light (the one closest to the battery pack) push it through the holes. You want to push up from the bottom of the box. I pushed the lights in first to make sure they fit in all the holes and because I used some thin nylon spacers that were a bit challenging to work with. More on that later.
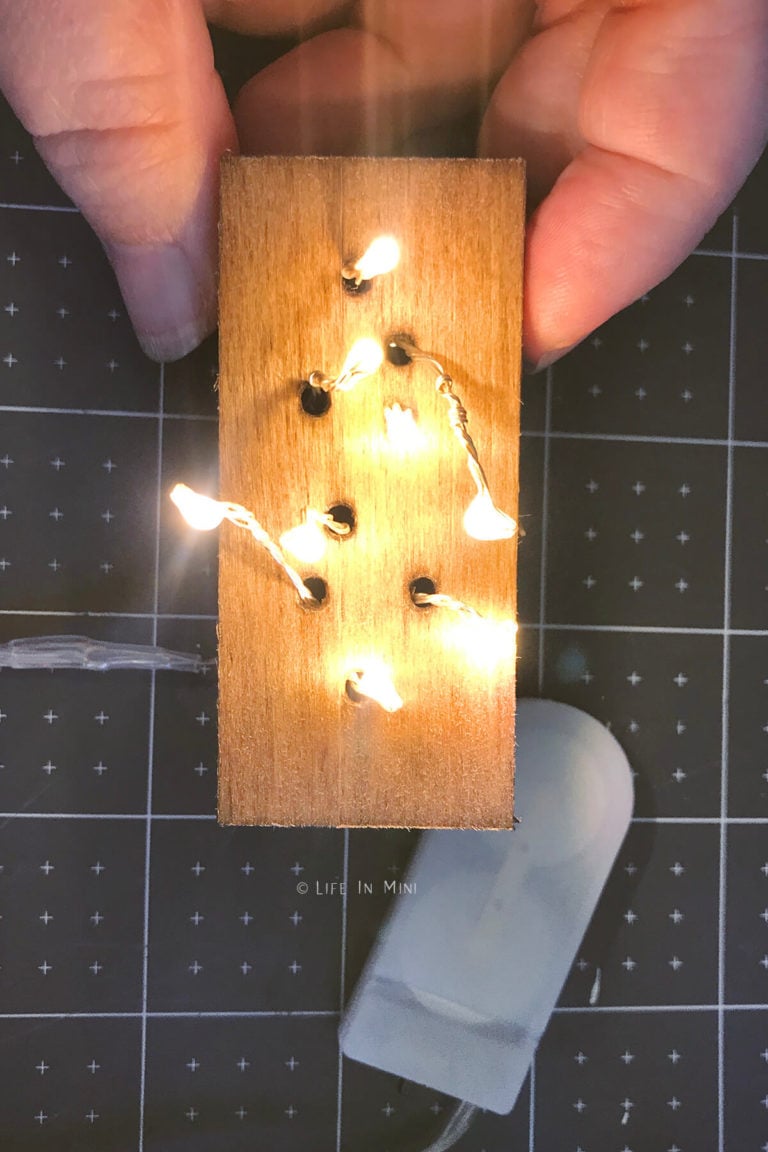
8. Working your way from the larger nylon spacers to the smaller, start passing the spacers thru the lights and glue to the wood top. I used hot glue for this step. Continue gluing the spacers onto the wooden top.
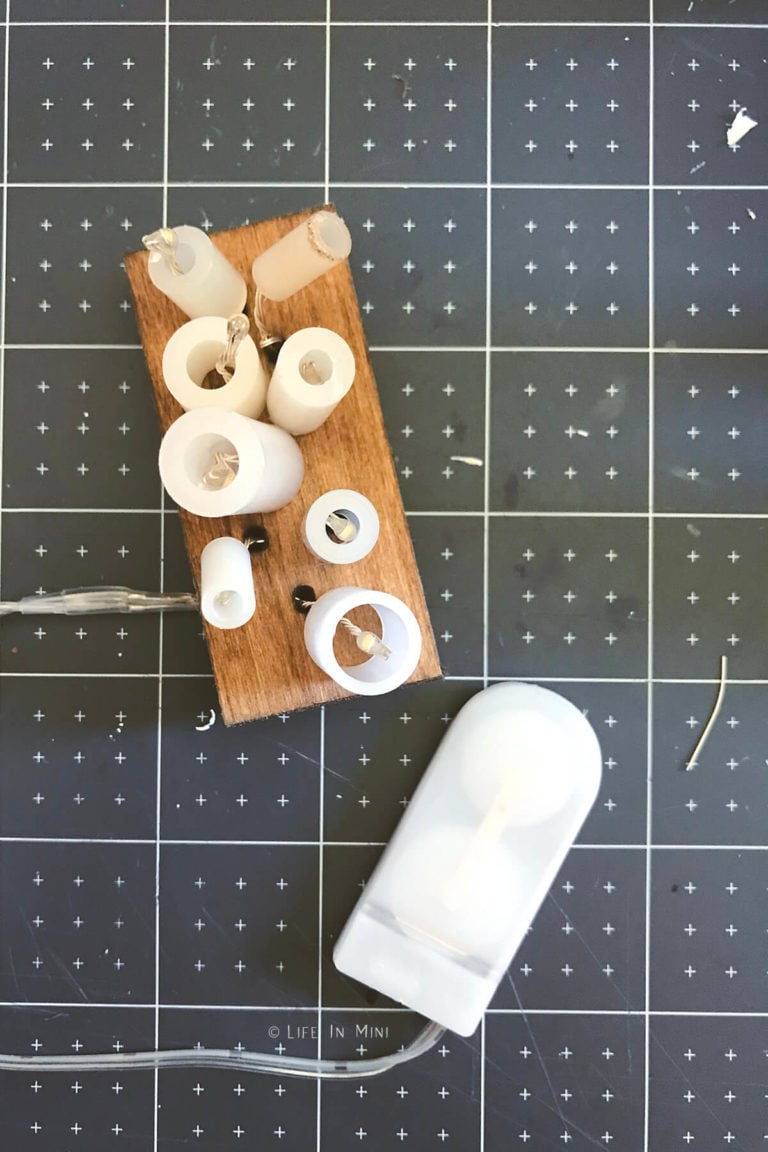
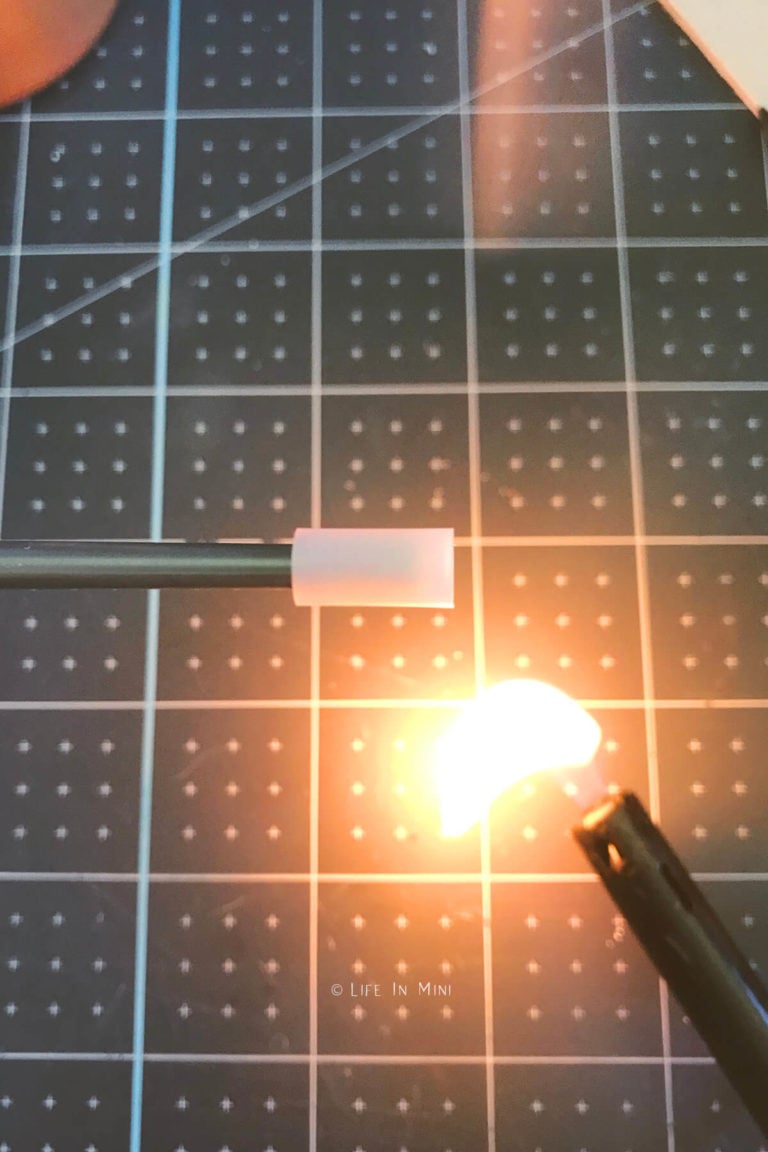
9. As I mentioned before, I wanted some smaller candles in my arrangement. Once you fold the fairy lights, it is rather tough to pass them thru the very thin nylon spacers. So I stuck these thin spacers (one at at time) onto a thick paint brush handle or metal tool. Then run a lighter gently under the spacer, rotating it so that the entire piece gets warmed and softens. Gently push the warmed spacer up the rod. This will help widen the inside of the spacer. Once you feel it widening, remove it from the paint brush, push it thru the appropriate fairy light and glue to the wood. You can avoid this annoying step by not using the thin nylon spacers, but hey, I like to make things complicated for myself! And I really love how it all turned out.
10. Once the spacers are glued down, pull a fairy light down to the desired position inside the spacer. I had some close to the top and others a little further in to mimic candles burning at different lengths. Squeeze hot glue from the top of the spacer down in and over the fairy light. While cooling, you can pull up some of the glue thru the top to mimic a real flame. Continue doing this with all of the fairy lights.
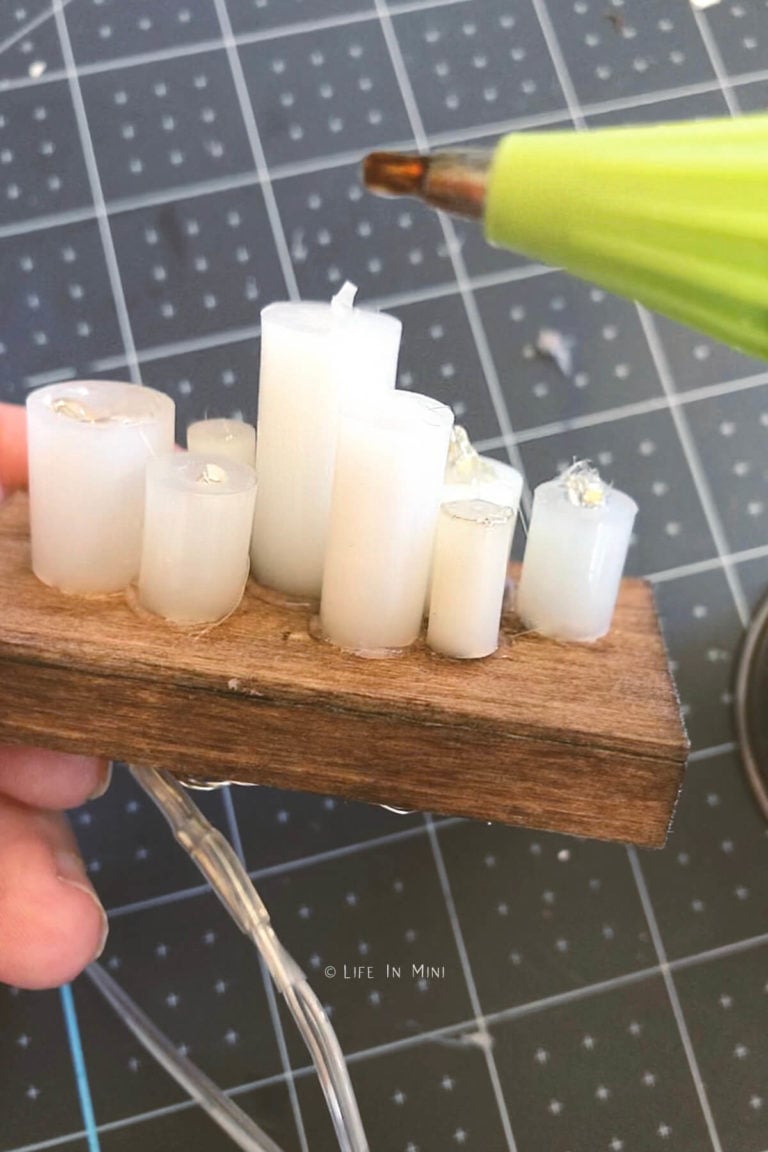
11. I used a jewelry chain that I had laying around the house to hang the miniature chandelier from the ceiling. You will need to cut 4 equal chains. The length will depend on the height of your dollhouse ceiling and how low you want to hang the chandelier. You will also need 4 eye pins. Attach each chain to one eye pin. Pierce a small hole into the four corners of your chandelier for the eye pins. Add Aleene’s tacky glue to the straight pin of the eye pin and place in the hole. Let it dry completely. Once dried, turn the box over and add some hot glue into the four corners to fully secure the eye pins.
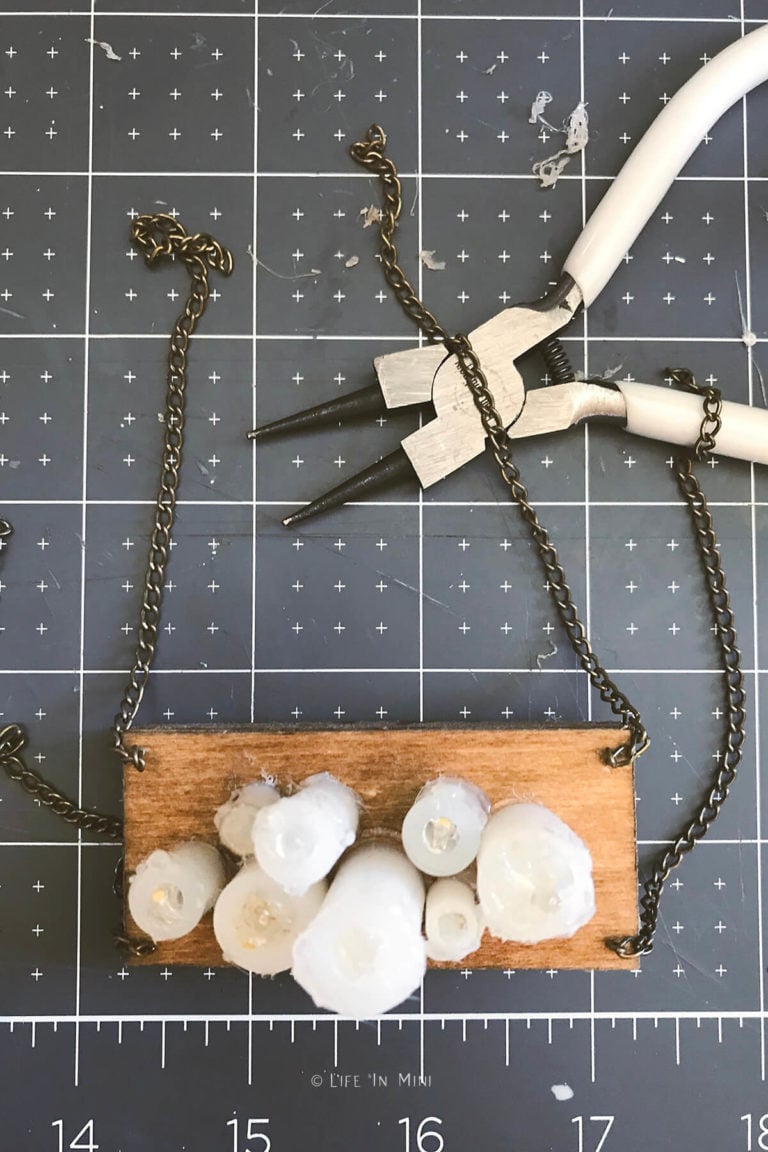
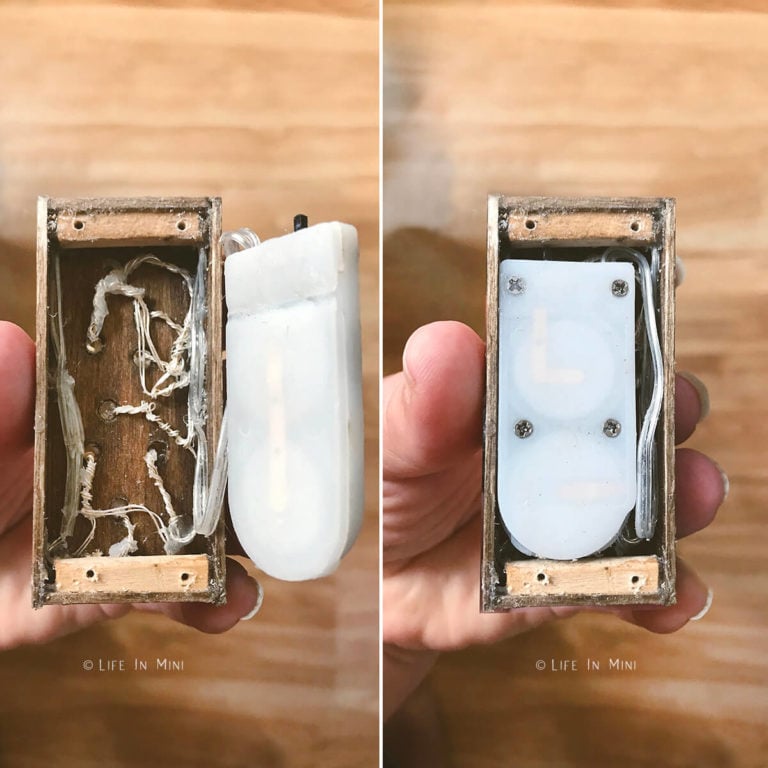
12. Securing the bottom of the chandelier proved to be the most challenging part of this whole project. The switch to the fairy lights would be inside this box and needed to be accessible. Also, you needed an easy way to change the batteries. Gluing the battery pack to the box wasn’t possible because it made changing the batteries very difficult. I tried using magnets, museum wax, an electrical tape hinge, small dabs of hot glue…. In the end, I asked my mechanical engineer husband for help. The best solution was to screw the bottom in and add a hole so you could slide a stick in the box to slide the power switch on and off.
Because I was using 3mm basswood for my box, I could not screw anything directly into this wood. We cut two small pieces of wood from a small block of wood and glued them on the two short ends of your box. Make sure you have room for your battery pack!!!
Before securing the bottom, glue down the fairy light wiring. The longer wire that connects to the battery pack can be cut and reattached to shorten it. I just glued it along the edges of the inside of the box.
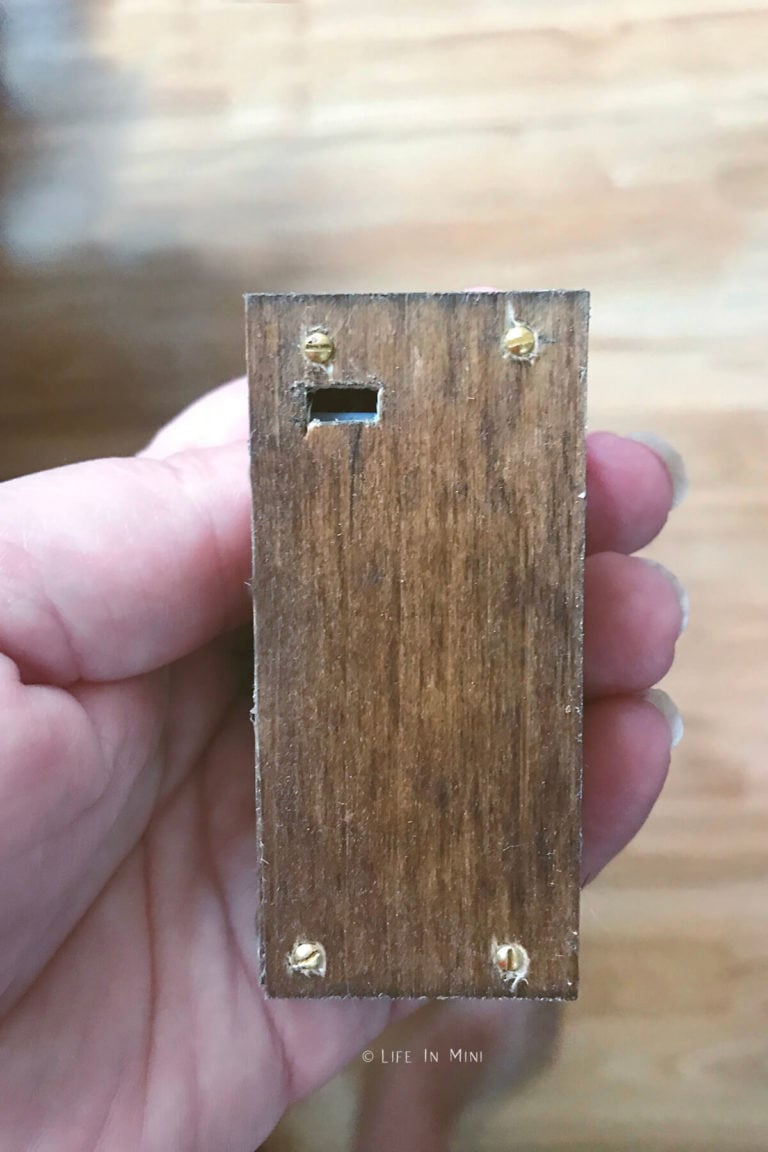
13. For access to the switch, we originally thought that a side opening would work. But because we had to add blocks for the screw, we ended up adding a small slit on the bottom of the box. You will need a small drill or xacto blade to do this. Where it will be positioned will depend on where your switch is positioned in your own chandelier.
14. To hang the mini chandelier, you need to gather the 4 chains together up and towards the center of the box. Make sure that the chains are even or your chandelier will hang crooked. Use a small piece of wire or paper clip to secure them all together, then cut the excess wire. To attach the chandelier on the ceiling, I used cheap Dollar Tree magnets. I glued one to the ceiling and the other to the secured chains. There was some disagreement with my husband who felt that I only needed to glue a small washer to the chandelier, but I felt using two magnets held the chandelier more securely.
Project tips and FAQs
Throughout the building process, keep turning your fairy lights on and off to make sure they remain working. The last thing you want to do is ruin the electrical and have to start all over again.
To make your candle pillar look more realistic, add some hot glue drips along the rims and sides of each nylon pillars. Once dried, be sure to pull any loose strings.
I still need to make the magnet part of this light fixture pretty. But for right now, it is functional and I am fine with that. You can paint the magnets the same color as your ceiling for it to blend in. Or you can paint it bronze or whatever metallic color to make it look like a normal ceiling mount. And not like magnets, which is what it looks like now!
These fairy lights are quite bright, even with only 8 lights. My husband thought they would make a pretty Christmas tree ornament, too. What do you think?

Laura’s Top Pick:
Fairy lights are a cheap and easy way to create dollhouse lighting, from chandeliers to ceiling lights and many other mini lighting projects.
If you are enjoying my blog, why not sign up for my newsletter so you won’t miss out on the mini adventures!
DIY Rustic Dollhouse Chandelier with Candles
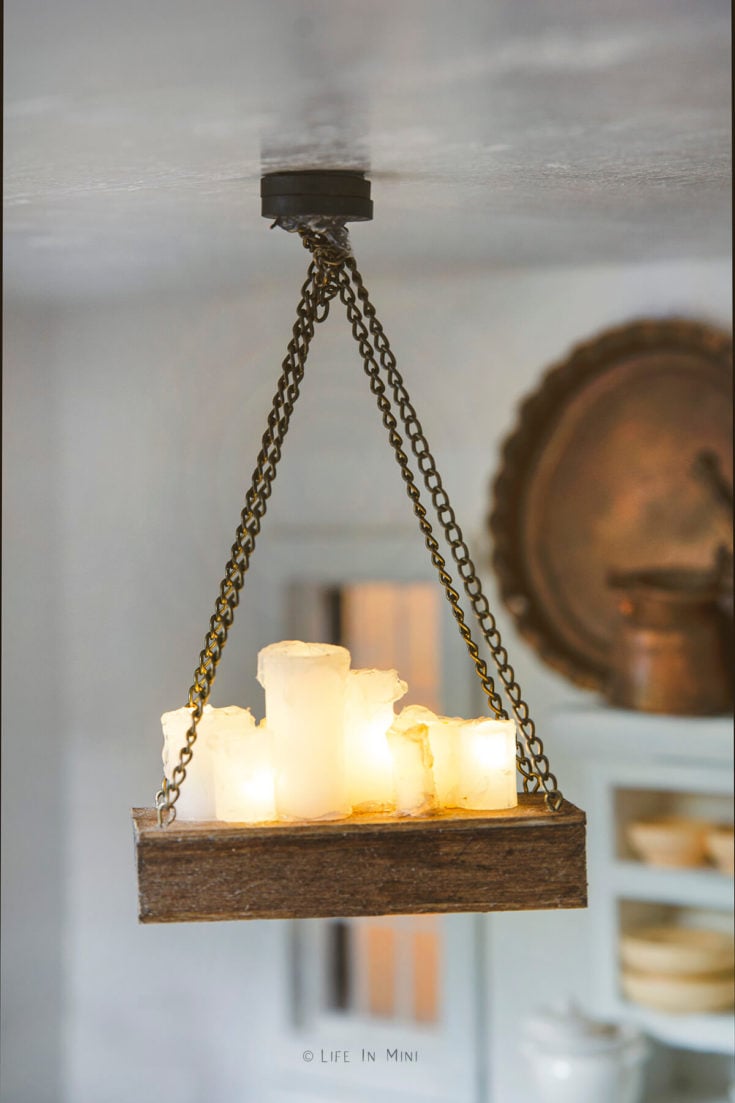
Upgrade your dollhouse lighting by making your own rustic dollhouse chandelier with candles. This DIY chandelier is made with inexpensive items you can find at the dollar store or hardware store.
Materials
- Sheet of basswood
- Basswood block
- Assorted nylon spacers
- Fairy Lights (powdered by coin cells)
- Jewelry chain
- Jewelry eye pin
- Disc magnets
- Wood stain
- Aleene’s Tacky Glue
- Hot glue
Tools
- Wood cutters
- Xacto blade
- Sand paper
- Mini drill
- Ruler
- Wire cutters
- Small pliers
Instructions
- Using your preferred cutting tools, cut the basswood to form your box. You will need two big rectangles (3.175cm x 6.985cm) for the top and bottom, plus the 4 thin sides (2 at 1cm x 6.985cm and 2 at 1 cm x 2.8575cm).
- Sand the wood pieces smooth, then stain or paint your wood pieces to desired color. Let it dry completely.
- Glue the sides to the top wood piece using wood glue or Aleene’s Tacky Glue and let it completely dry.
- Position your nylon spacers onto the top piece into an arrangement you are happy with. I positioned the taller pillars in the center and surrounded them with shorter pillars.
- Using the tip of an xacto knife or a pointy tool, mark an indentation down the center of each nylon spacer. I also dipped the end of my pointy tip into white paint to better see the indents.
- Take a picture of your arrangement or place the spacers on your workspace in the arrangement you have selected.
- Using a small drill, carefully drill small circles where the indentations are. You will need a 3mm circle to accommodate for the fairy lights to pass through. The basswood can split during this process so be careful, speaking from experience.
- I also cut these circles with my Cricut Maker when I first cut the rectangular pieces.
- The fairy lights I bought have 20 lights on the strand. I only need 8 lights. Using wire cutters, cut past the 8th light using about half the wire after the light.
- Starting with this last light, fold the wires on each side and twist together. Continue folding and twisting the wires for each light on the strand.
- Starting with the first light (the one closes to the battery pack, start pushing it through the holes. You want to push up from the bottom of the box. Make sure they fit in all the holes.
- Working your way from the larger nylon spacers to the smaller, start passing the spacers thru the lights and glue to the wooden top. I used hot glue for this step. Continue gluing the spacers onto the wood.
- If some of your nylon spacers are thin and the lights won't quite push thru them (like some of mine), warm the spacer under a flame and push it thru the end of a paint brush to widen them. Then pass the lights thru and glue it down.
- Once all of the spacers are glued down, pull each fairy light down to desire position inside the spacer. I had some close to the top and others a little further in to mimic candles burning at different lengths.
- Squeeze hot glue from the top of the spacer down in and over the fairy light. While cooling, you can pull up some of the glue to mimic a real flame. Continue doing this with all of the fairy lights.
- Cut your jewelry chain into 4 equal lengths. The length will depend on the height of your dollhouse ceiling and how low you want to hang the chandelier.
- Attach each end of the chain to one eye pin.
- Pierce a small hole into the four corners of your box top for the eye pins. Add Aleene’s tacky glue to the straight pin of the eye pin and place in the hole. Let it dry completely.
- Once dried, turn the box over and add some hot glue into the four corners to secure the eye pins.
- Hot glue the wires to the box, focusing on moving as much of the bulk to the outer edges.
- Hot glue the wire that connects to the battery pack along the edges of the box. You can also cut, reattach and shorten this wire. This helps reduce the bulk of the wires in the box.
- Measure and cut two small rectangle pieces of wood from your block and glue them to each of the short ends inside your box. This is to secure the bottom of the box using screws. Make sure you have room for your battery pack.
- Drill a hole into each corner of your bottom piece so that a mini screw can pass thru and into this wood block.
- If you want a small slit so you can turn your light on and off without removing the bottom, locate where the switch is. Mark a small line on the bottom piece of wood and either drill or use an xacto to cut this out.
- Secure the bottom using the mini screws.
- Gather the four chains together above and towards the center of your chandelier. Using a small wire or paper clip, slide it through each chain. You want to make sure the chandelier hangs evenly. Twist the wire once all 4 chains are even and on the wire.
- Hot glue this piece to a small disc magnet.
- Find where you want your chandelier to hang and hot glue another disc magnet here. Please test and be sure your magnets are facing the right way and will not repel each other.
- Connect your chandelier to the ceiling magnet and you are done!
Notes
This dollhouse chandelier is battery operated using two CR2032 Lithium Coin Cell Batteries.
You can find the supplies for this project on Amazon, hardware stores and dollar stores.
PS If you try this craft, why not leave a star rating in the direction card right below and/or a review in the comment section further down the page? I always appreciate your feedback.
You can also follow me on Pinterest, Facebook or Instagram. Sign up for my eMail list, too!




Theresa Foley says
Thank you for sharing this chandelier tutorial!! I am currently working on a dollhouse for my granddaughter and you have so many cute ideas that I can’t wait to try!! I appreciate you taking the time to share your creativity!
Laura says
Hi Theresa-
I’m so glad these tutorials are helpful to you. I’m sure your granddaughter is going to love that you made so many pieces by hand.
Laura
DDigs says
what a great idea and I didn’t know you could cut the length of the fairy lights.
Laura says
I know! I was surprised when I first learned this, too!
Laura
Lea says
This is ingenious and I felt fairly easy. I just made one for my new dollhouse I built and it’s beautiful! Thank you for taking the time to post this and provide detailed instructions. Luckily we had an old hamster “swing” made out of wood with small chains already in the position you need for this. Then I cut down some natural wood paint sticks I found awhile back for the outer frame. Then I just affixed the bottom with two small wood blocks and gorilla glue mounting putty. It’s easily removable. The hardest part was drilling the holes!
Laura says
Hi Lea-
I’m so glad your chandelier turned out well! I finally got one of those mini hand drills since I’m all thumbs!
Laura
Karen says
I absolutely loved the step by step instructions with pictures. This will definitely go into my next project.
Laura says
Hi Karen-
Happy to help and can’t wait to see what you come up with!
Laura
Jamie says
Such a gorgeous mini light fixture! I really appreciate the tutorial including all the supplies and directions. You did a fabulous job!
Laura says
Hi Jamie-
Thank you for your sweet words. I’m so glad you found the tutorial useful.
Laura