


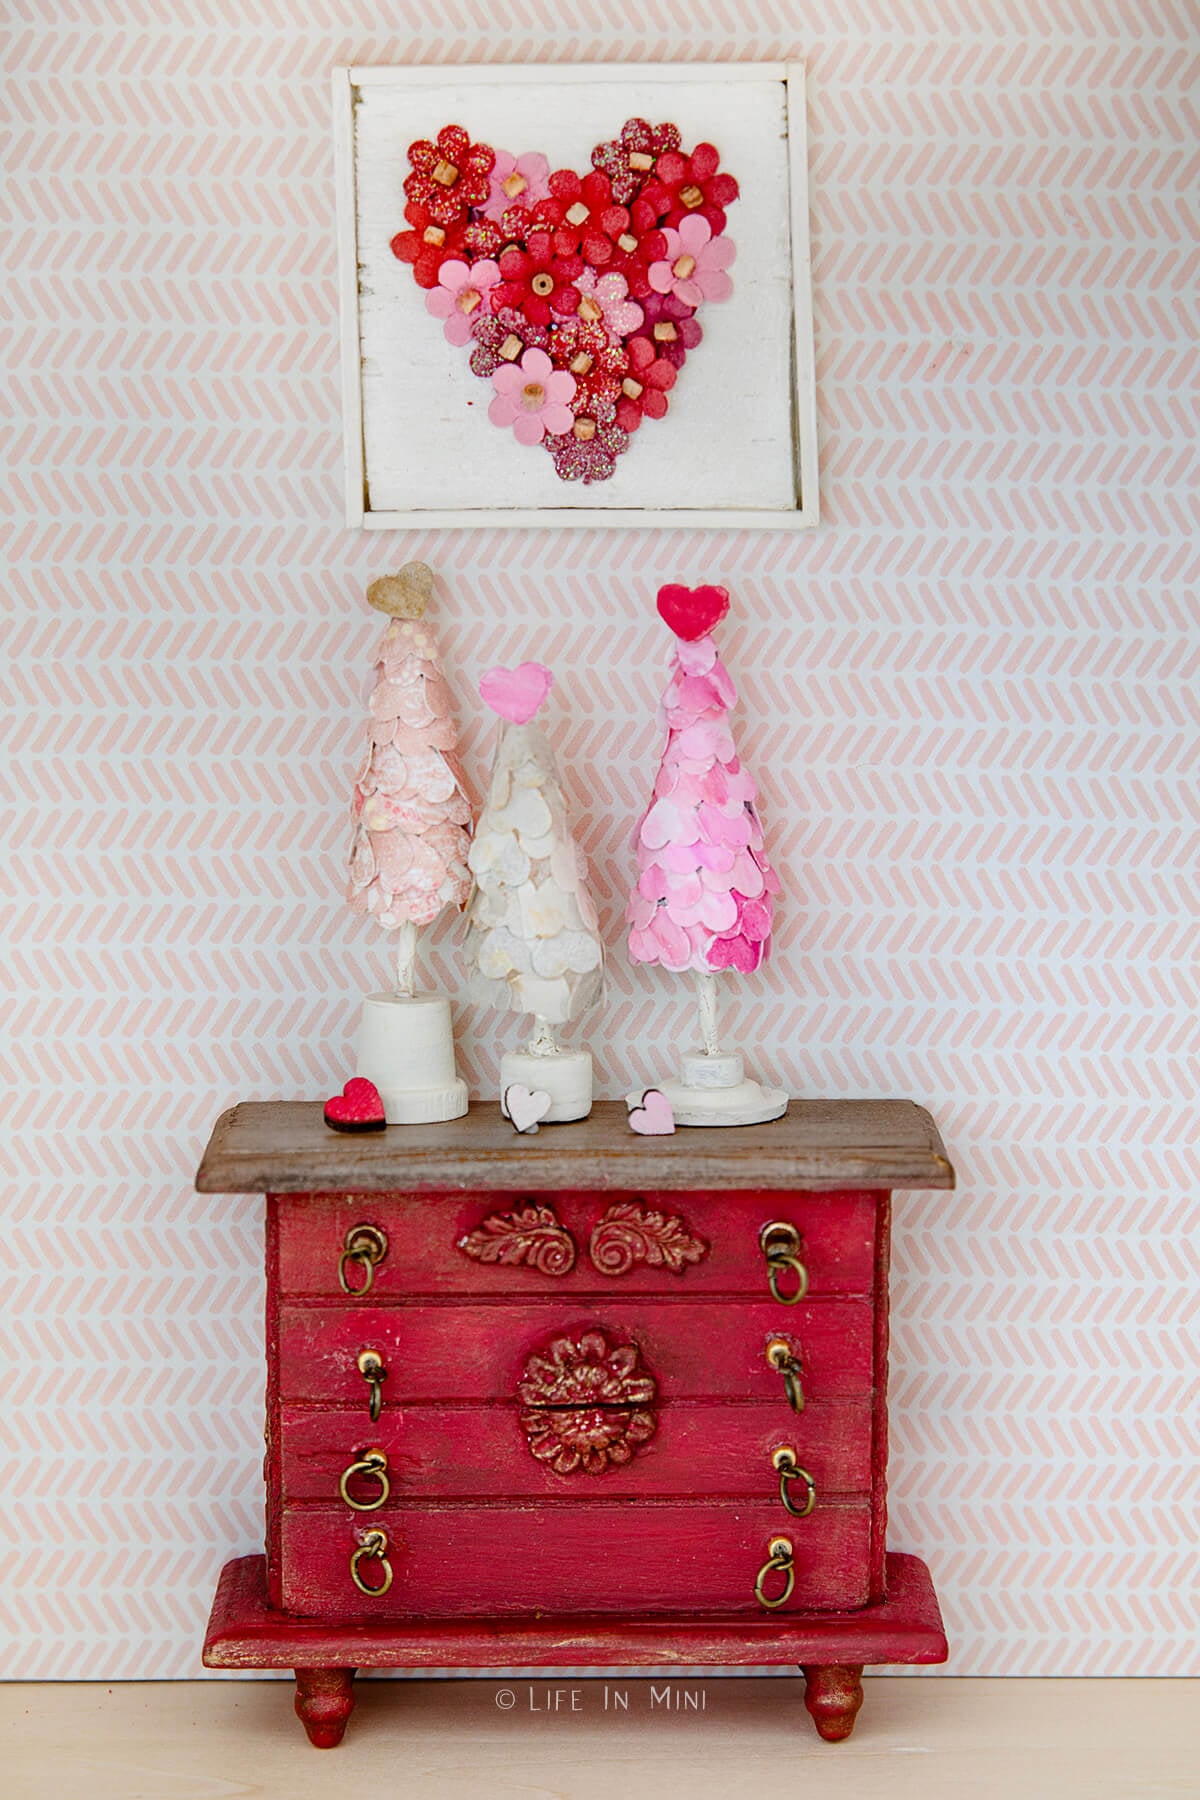
Add some love and a touch of whimsy with this easy valentine craft project. These mini heart valentine trees are made with scraps you have at home, and are sure to bring a smile and lots of love to your miniature scene.

I have been enjoying making a bunch of Valentine miniatures. Maybe it’s the colors of reds and pinks that bring me a smile. Maybe it’s because my children have always enjoyed celebrating this “hallmark holiday.” Maybe it’s the chocolate?!
So far, I have shared a tutorial on how to make a miniature valentines cake from polymer clay. I have recently shared a free mini conversation hearts printable.
While I was setting up the scene for those miniature conversation hearts, I was searching through pinterest for inspiration. I love finding home decor or DIY projects and making them in miniature for the dollhouse. So when I found these adorable felt heart Valentine trees and knew I could make something similar in miniature.
This was SO MUCH FUN and so easy to make. I seriously love how they turned out and hope you enjoy making them, too.
Supplies you need

This post contains some affiliate links for your convenience (which means if you make a purchase after clicking a link I will earn a small commission but it won’t cost you a penny more)! Read my full disclosure policy.
- Heart paper punch: You will need a heart paper punch. I have this set which includes other great shapes you can use to make miniatures.
- Scrapbook paper: You can use any color scrapbook paper for your hearts. I also painted some white paper with watercolors. To fake watercolors, you can use color with markers and blend it all together with a paint brush and water.
- Glue: I love my Aleene’s Tacky Glue to secure the pieces together. You need a glue that dries clear.
- Mod Podge: Although I didn’t use this, you can add some gloss Mod Podge to make the paper hearts shiny.
- Styrofoam: You will need a cone shape to glue your hearts on. You can cut one from some scrap styrofoam. I also use a chunk of styrofoam to hold the trees while I worked.
- Foil: You can also make a cone form using aluminum foil.
- Air dry clay: You can also form the cone base using air dry clay. I also use a little of this stuff to help secure the stands until the glue sets.
- Paint: I used regular acrylic paint to paint the wooden or plastic bits that I used for plant pots. I also adjust the color of some the flowers and leaves with paint.
- Brushes: I used small paint brushes to paint the stand and base.
- Toothpicks: I use toothpicks as the stand for my trees. I also used them to dab tiny bits of glue and to maneuver the hearts in their place.
- Tweezers: When securing the hearts on the cone forms it was easier to handle them with long tweezers.
- Cutters: I use wire cutters to trim the toothpicks to the right height. You could also use an x-acto blade.
- Wood for base: I used various items for different bases for the trees. One is a small wooden plant pots that is inverted. Another is a small wood bead. The third includes 3 pieces, mini wood rounds and a wood spacer bead. You could also form something using air dry clay or any other scraps you have available.
Step-by-step directions

- Form your cones. I made three heart trees and each cone base that I used was made with different materials. All three worked great: air dry clay, aluminum foil and styrofoam. I think I prefer the air dry clay as I was able to make the exact shape I wanted, but honestly all three worked well.
- Add the stand. Using a little glue, insert a toothpick into the base of the cone and let it set by inserting it into a chunk of foam. If using air dry clay, be sure to do this before the clay dries.
- Punch out the hearts. You can use any colorful scrapbook paper for your hearts. I also painted some paper pin with watercolors. Just let the paint totally dry before punching out the hearts with your hole punch.
- How many heart punches you need will depend on how tall and wide the trees are. I used about 40 hearts for one tree that is about 1½-inches tall.

- Glue on the hearts. Use a toothpick to add glue to the back of the hearts and tweezers to stick them onto the cones with the hearts upside down. Start from the bottom and go around the tree form until you fill it completely.
- Assemble the base. Whatever base you choose for you tree base, be sure to paint it before attaching it the rest of the tree. And if it requires a little assembling, glue it together first and then paint it. You will also paint the toothpick. I used vintage white. As you see below, I used different bits of wood to make 3 different wood bases.
- Finish the trees. Glue two hearts together then glue it to the top of each tree. Cut the toothpick to the desired height and glue it to the base. Each base I used had a small hole in it so I didn’t have to drill any holes.
Project tips and FAQs
The beauty of this project is that you can use any color scheme you want. You can also use green hearts and make cute heart trees for Christmas. Have a wedding theme you are working on? Use white, golds and silver to make cute heart trees for your scene.
Add more glam to it by adding colorful beads, metallic paints or glitter.

If you are enjoying my blog, why not sign up for my newsletter so you won’t miss out on the mini adventures!
How to Make Mini Heart Trees

Add some love and a touch of whimsy with this easy valentine craft project. These mini heart trees are made with scraps you have at home, and are sure to bring a smile and lots of love to your miniature scene.
Materials
- Scrapbook paper
- Glue
- Mod Podge
- Styrofoam
- Foil
- Air Dry Clay
- Paint
- Toothpicks
- Small bits of scrap wood
Tools
- Heart paper punch
- Paint brushes
- Tweezers
- Cutters
Instructions
- Form your cones. I made three heart trees and each cone base that I used was made with different materials. All three worked great: air dry clay, aluminum foil and styrofoam.
- Add the stand. Using a little glue, insert a toothpick into the base of the cone and let it set by inserting it into a chunk of foam. If using air dry clay, be sure to do this before the clay dries.
- Punch out the hearts. You can use colorful scrapbook paper for your hearts. I also painted some paper pin with watercolors. Just let the paint totally dry before punching out the hearts with your hole punch. I used about 40 hearts for one tree that is about 1½-inches tall. You can also use watercolors and scrap paper instead of scrapbook paper.
- Glue on the hearts. Use a toothpick to add glue to the back of the hearts and tweezers to stick them onto the cones with the hearts upside down. Start from the bottom and go around the tree form until you fill it completely. I stopped about halfway and let the glue set before finishing as my fingers were getting sticky and messy. If you want the hearts shiny, brush on a thin coat of gloss Mod Podge.
- Assemble the base. Whatever base you choose for you tree base, be sure to paint it before attaching it the rest of the tree. And if it requires a little assembling, glue it together first and then paint it. You will also paint the toothpick. I used vintage white.
- Finish the trees. Glue two hearts together then glue it to the top each tree. Cut the toothpick to the desired height and glue it to the base. Each base I used had a small hole in it so I didn’t have to drill any holes.
Notes
You can use any color scheme you want. You can also use green hearts and make cute heart trees for Christmas. Have a wedding theme you are working on? Use white, golds and silver to make cute heart trees for your scene.
Add more glam to it by adding colorful beads, metallic paints or glitter.
PS If you try this craft, why not leave a star rating in the direction card right below and/or a review in the comment section further down the page? I always appreciate your feedback.
You can also follow me on Pinterest, Facebook or Instagram. Sign up for my eMail list, too!
Written by Laura Bashar
I’m a food blogger and cookbook author that loves miniatures and crafting. I started this blog to share my passion for minis, including tutorials and free printables.
Leave a Reply