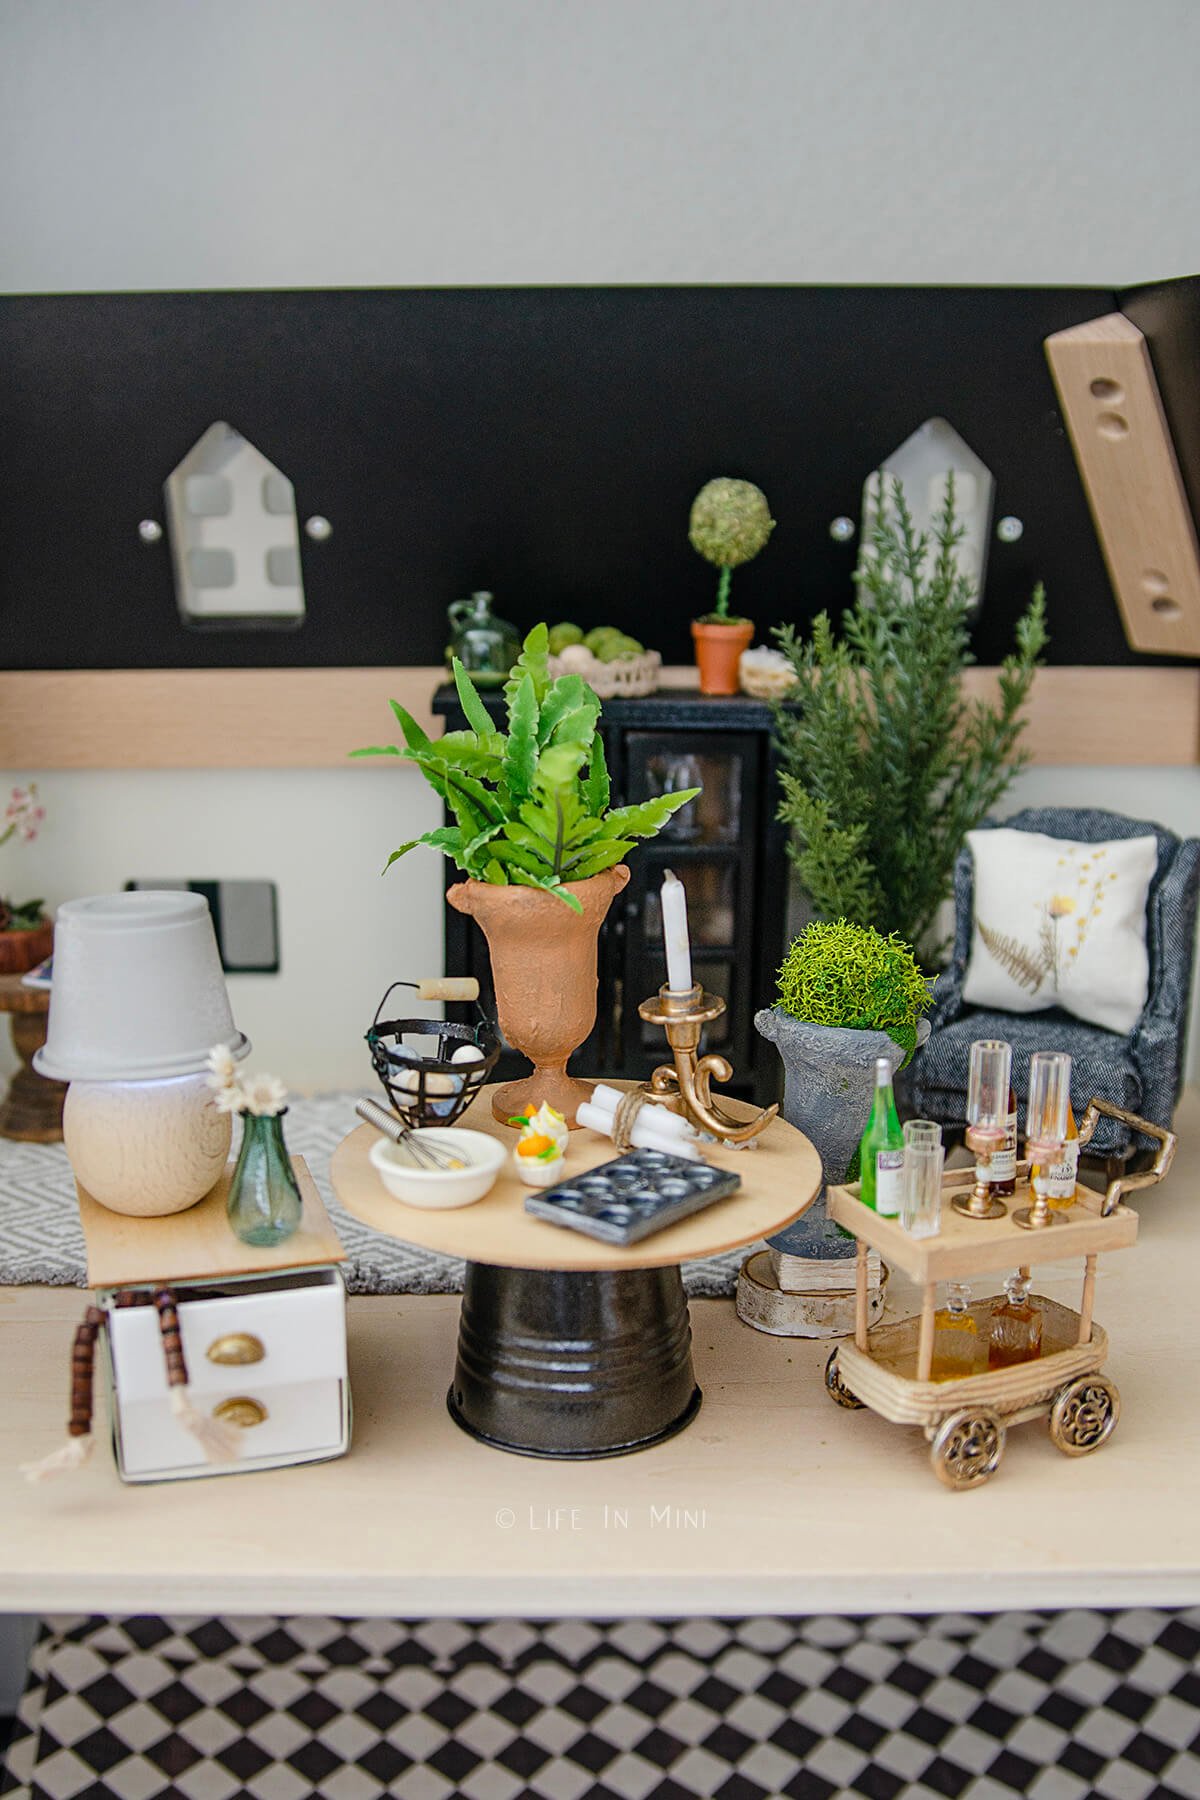
Here are some fun ideas for making dollhouse miniatures using those inexpensive plastic party favors! From planters and urns to baskets, glasses, and bar carts, you can create a whole collection of cute miniatures with just a few simple supplies – and without breaking the bank.
When you make miniatures of your own, you start seeing potential in everything bauble and trinket around you. As I have shared before, one of my favorite places to shop for miniature supplies is at the dollar store. This post shares another favorite place of mine to find inspiration for minis: the party favor aisle!
If you have kids, you have not only received, but also given those plastic little party favors for kids’ birthday parties. Even class halloween and Christmas parties share those cheap little holiday themed toys and trinkets.
Yes, they are cheap and plastic, that’s a good thing for mini makers. We love taking something for one purpose, reworking and glamming it up for our dollhouses. And of course, doing it on a budget makes it even better!
Hello – I did this with all those minis made from plastic pull tabs.
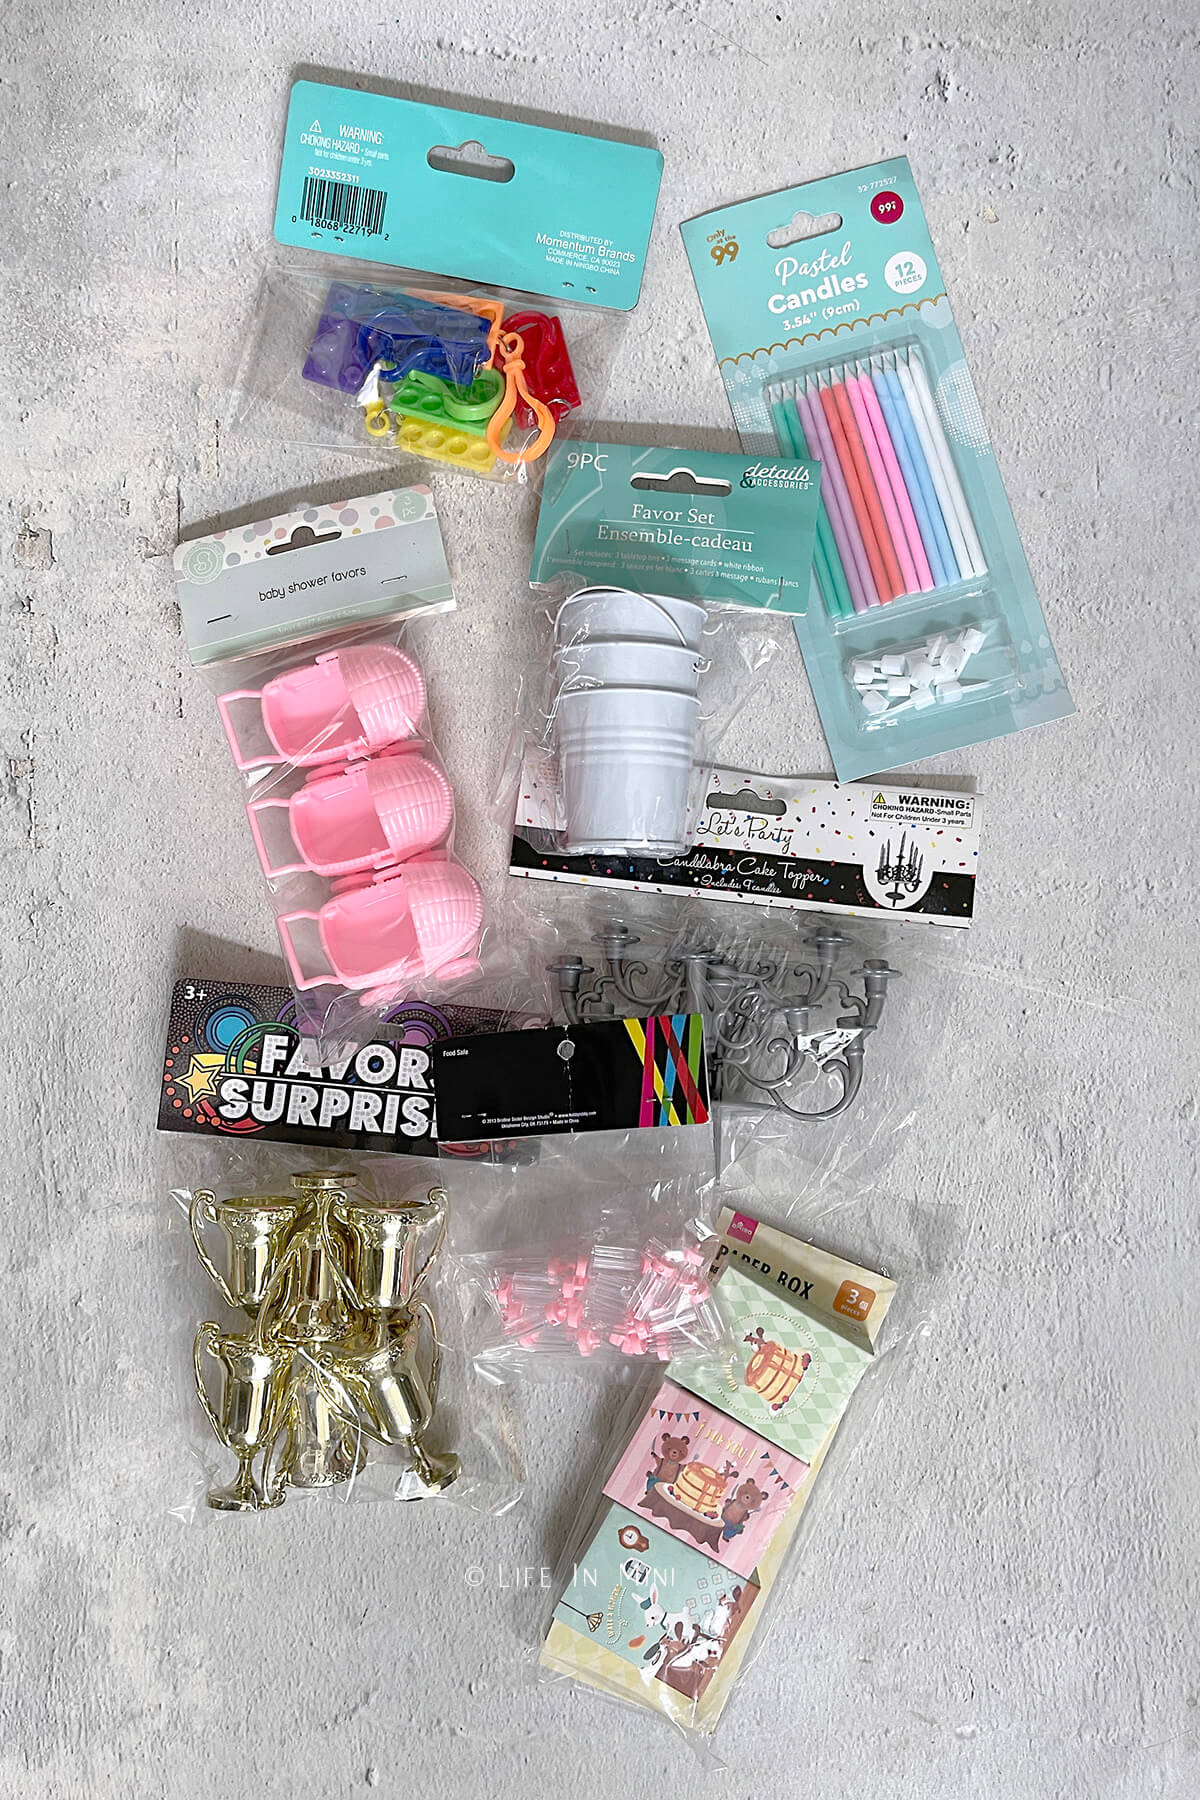
This past year I collected a variety of different party favors and kept them in a box, waiting to make things with them so I could write about it here. Some were purchased at the Dollar Tree, others from the now bankrupt 99¢ store. You can also find inexpensive party favors from other stores like Target, Wal-Mart, Hobby Lobby, Party City, the drug store and many other stores.
I don’t remember which came from what store specifically, but I tried to link to similar items online. Just be forewarned: it is MUCH less expensive to buy these kinds of items in the stores than it is online. Unless you buy in bulk and don’t mind receiving 30 pieces of one kind of plastic toy!
Supplies you need
This post contains some affiliate links for your convenience (which means if you make a purchase after clicking a link I will earn a small commission but it won’t cost you a penny more)! Read my full disclosure policy.
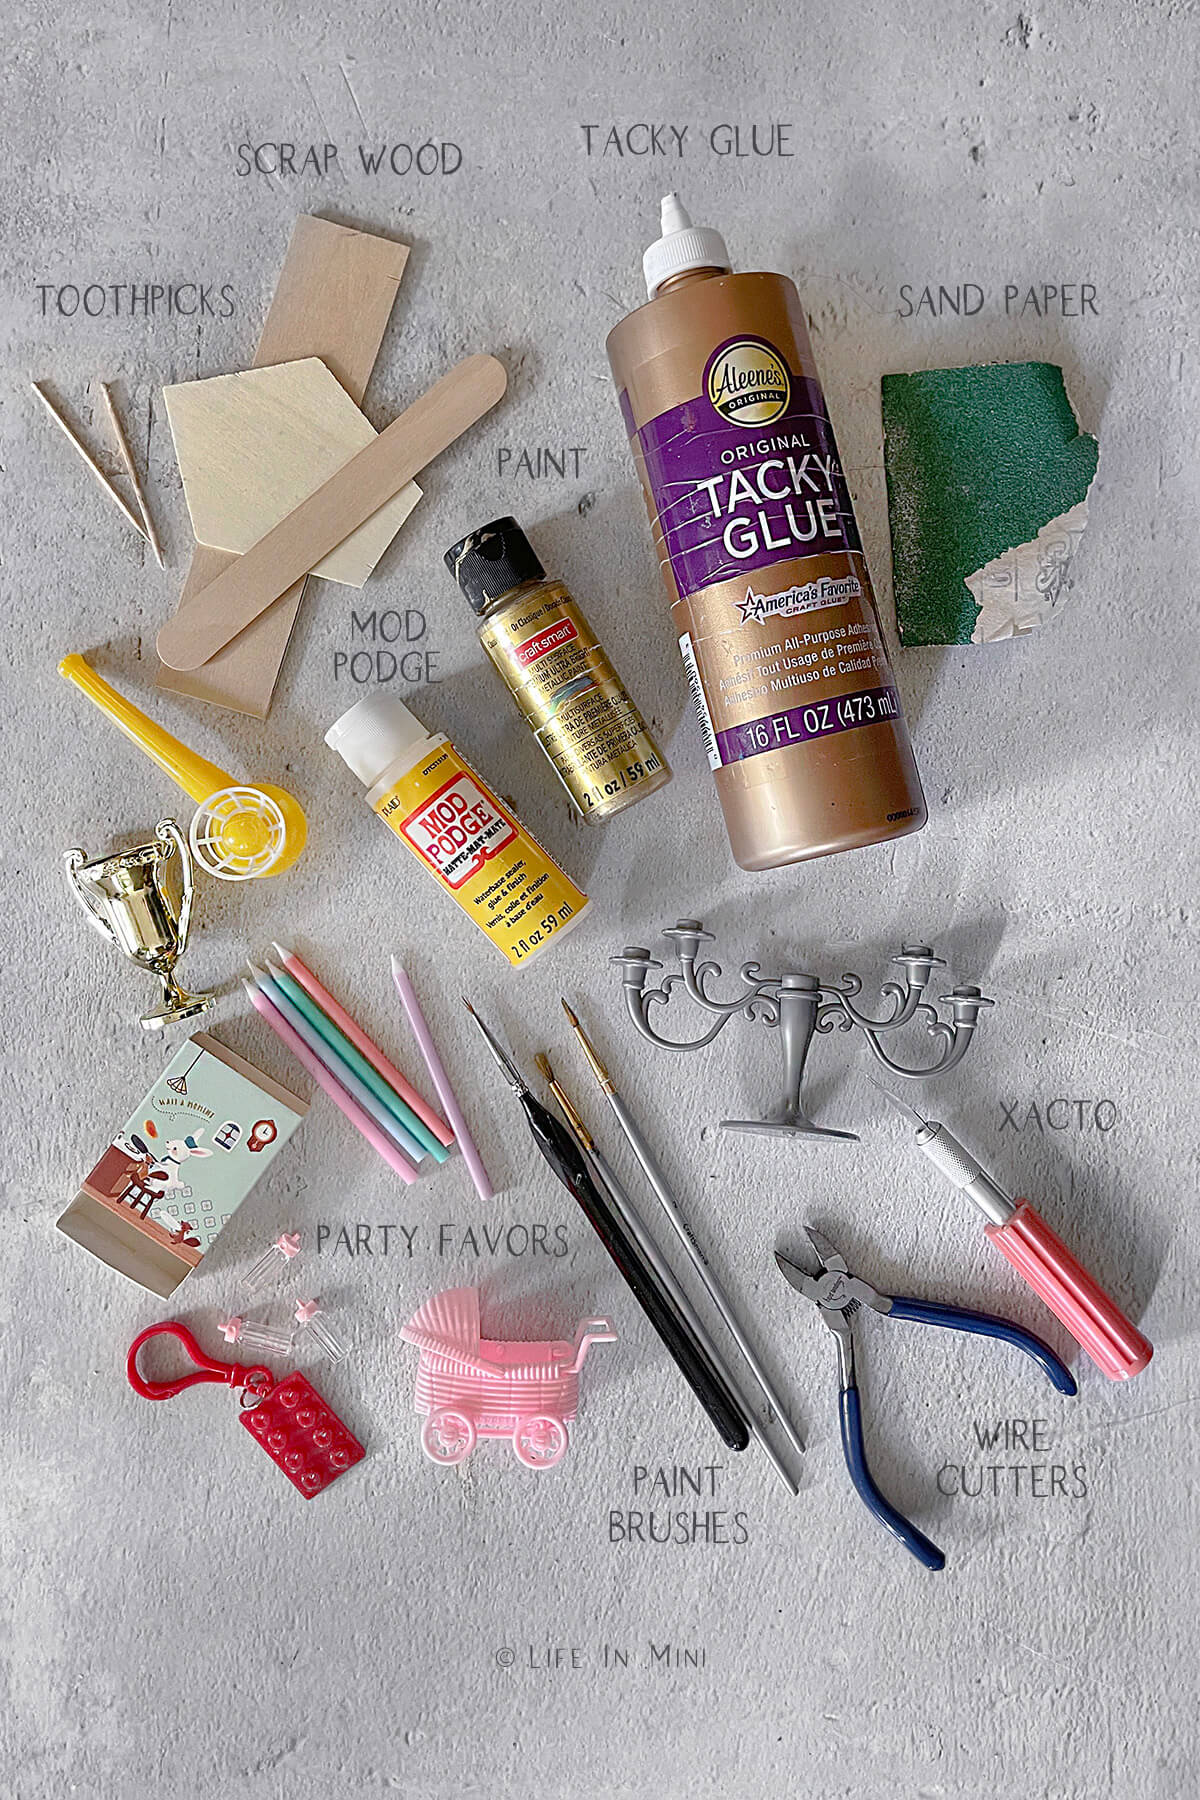
Depending on what project you are making, the supplies vary. But all of these projects are pretty simple and do not require expensive tools or supplies. These are the basic items you might need. I do explain what I use in specific projects in the next section.
- Cutters: Depending on what you are snipping or trimming, you will need to cut your plastic pieces. Sometimes you only need an x-acto blade, other times wire cutters were used. You will also need a cutting mat to protect your work surface.
- Paint: Painting plastic can be a challenge. of regular acrylic paint do work, but it does take several coats to fully cover it. Spray paint adheres to plastic, as well as enamel paints.
- Brushes: I like to use super fine paint brushes to paint the smaller pieces.
- Glue: I love my Aleene’s Tacky Glue to secure the pieces together. You need a glue that dries clear.
- Mod Podge: Although I didn’t use this, you can seal the paint jobs with either matte or gloss Mod Podge.
- Sand paper: Yes you can sand cut plastic to smooth it out!
- Lighter: For some projects I needed to heat the plastic piece or blade to cut it or shape it.
- Scrap wood: Some of the projects required some scrap wood or toothpicks. You can easily get these at dollar stores and not spend a fortune.
Step-by-step directions
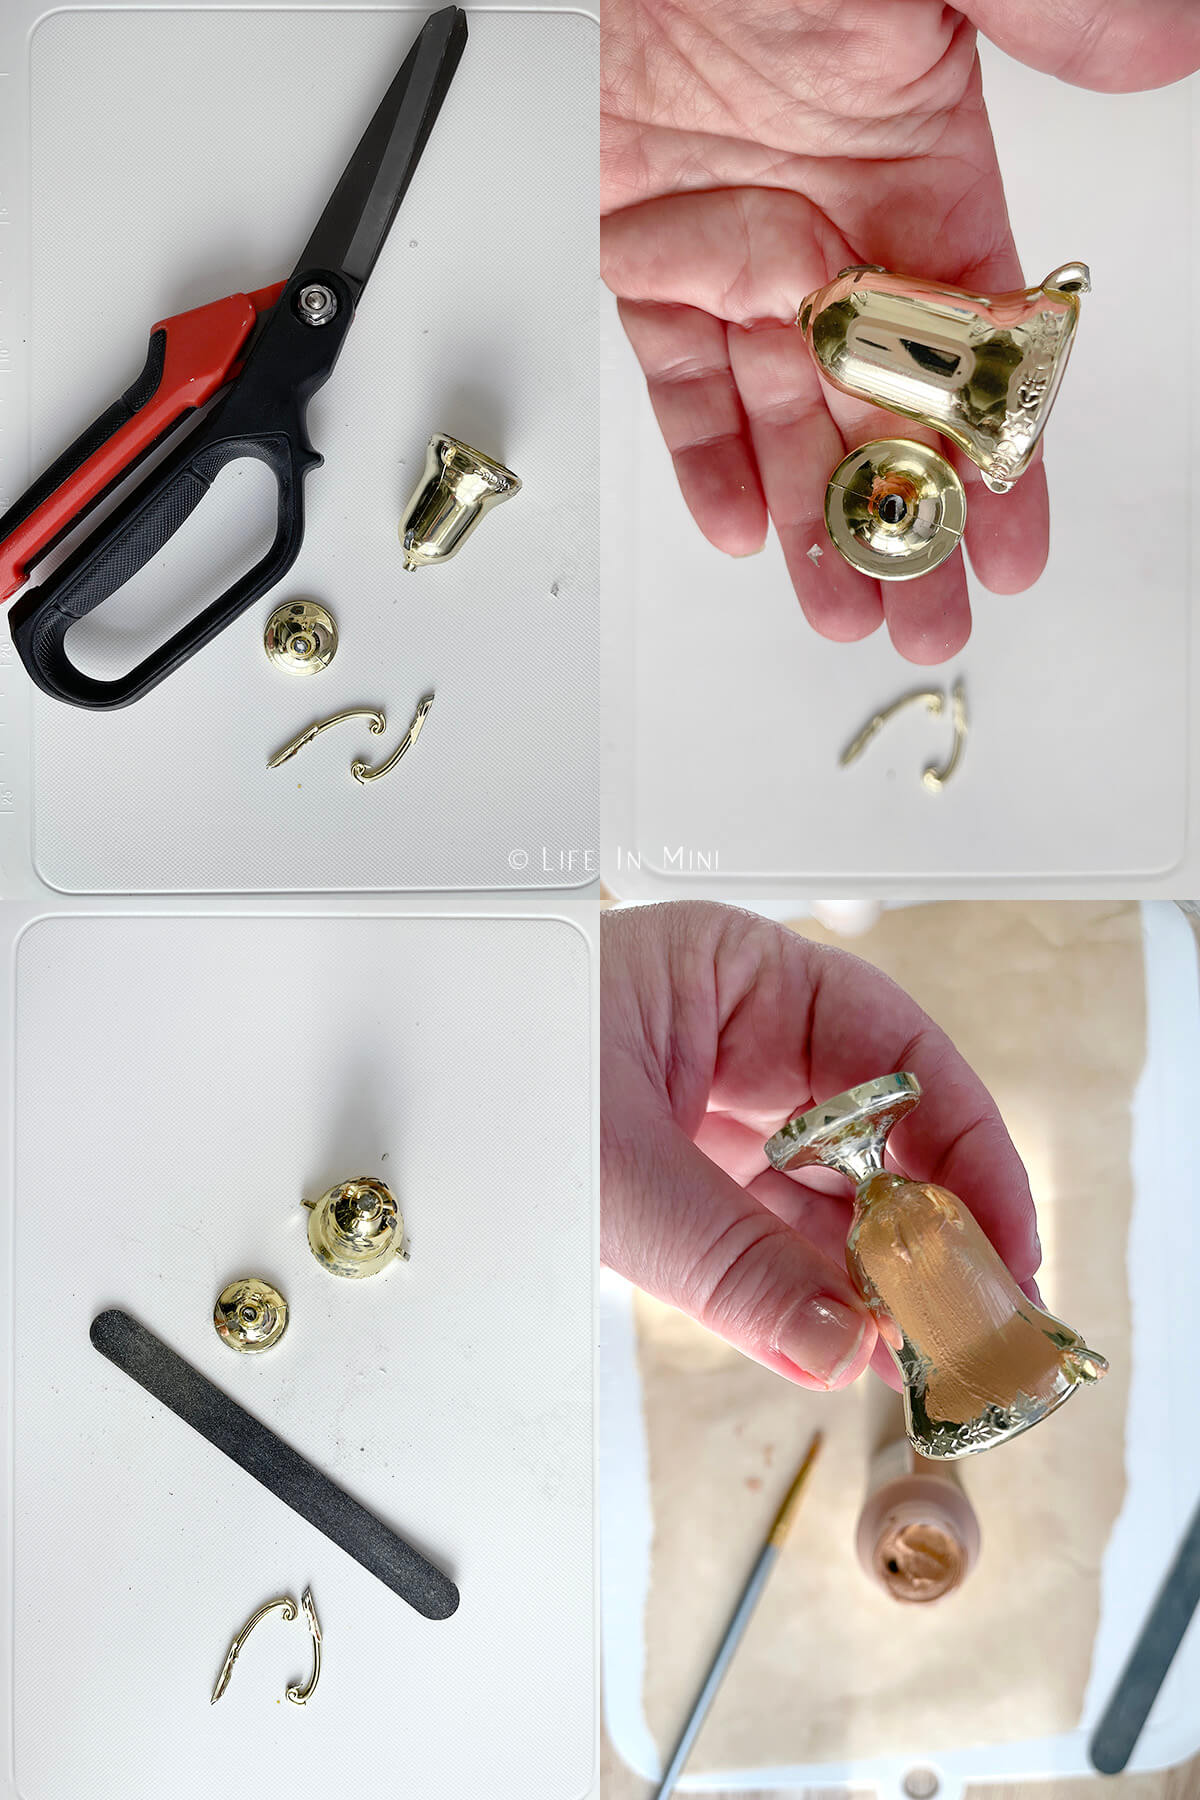
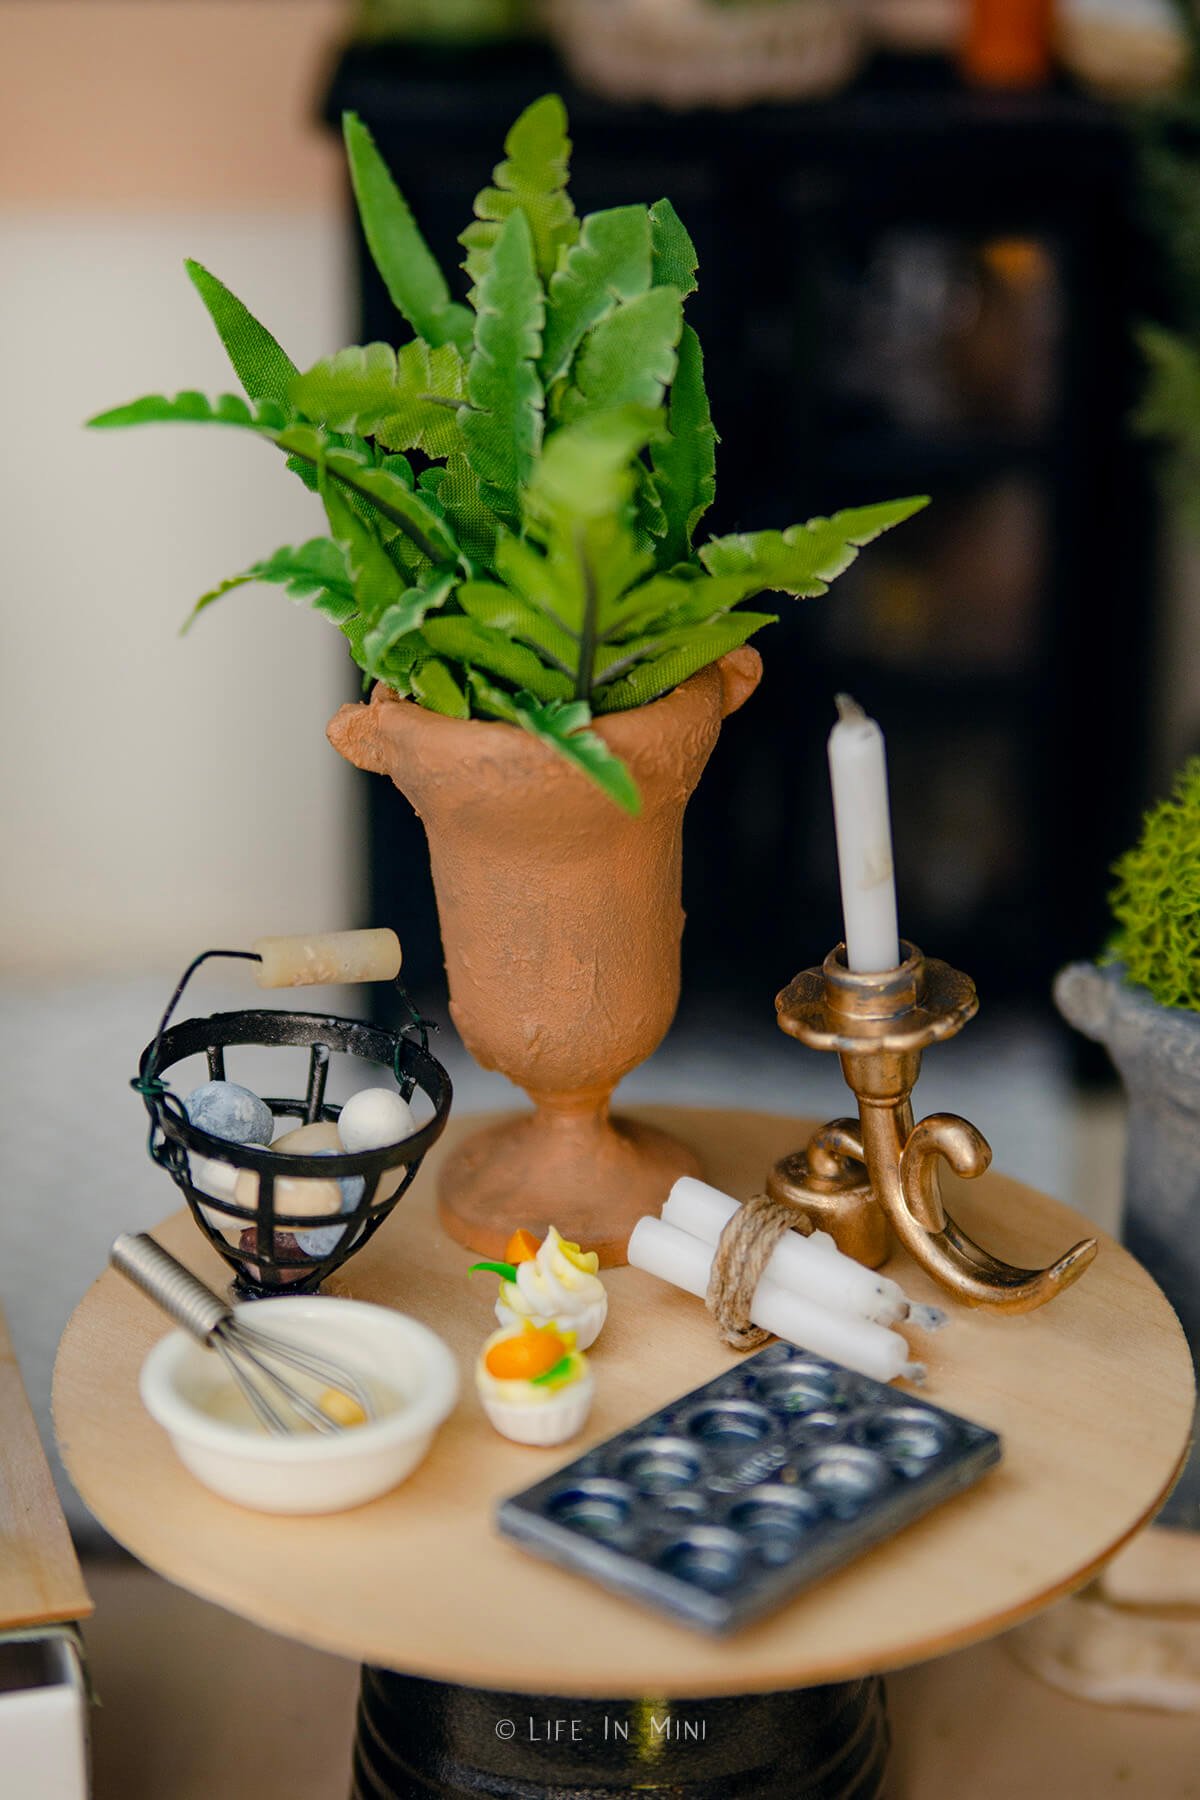
Mini trophy
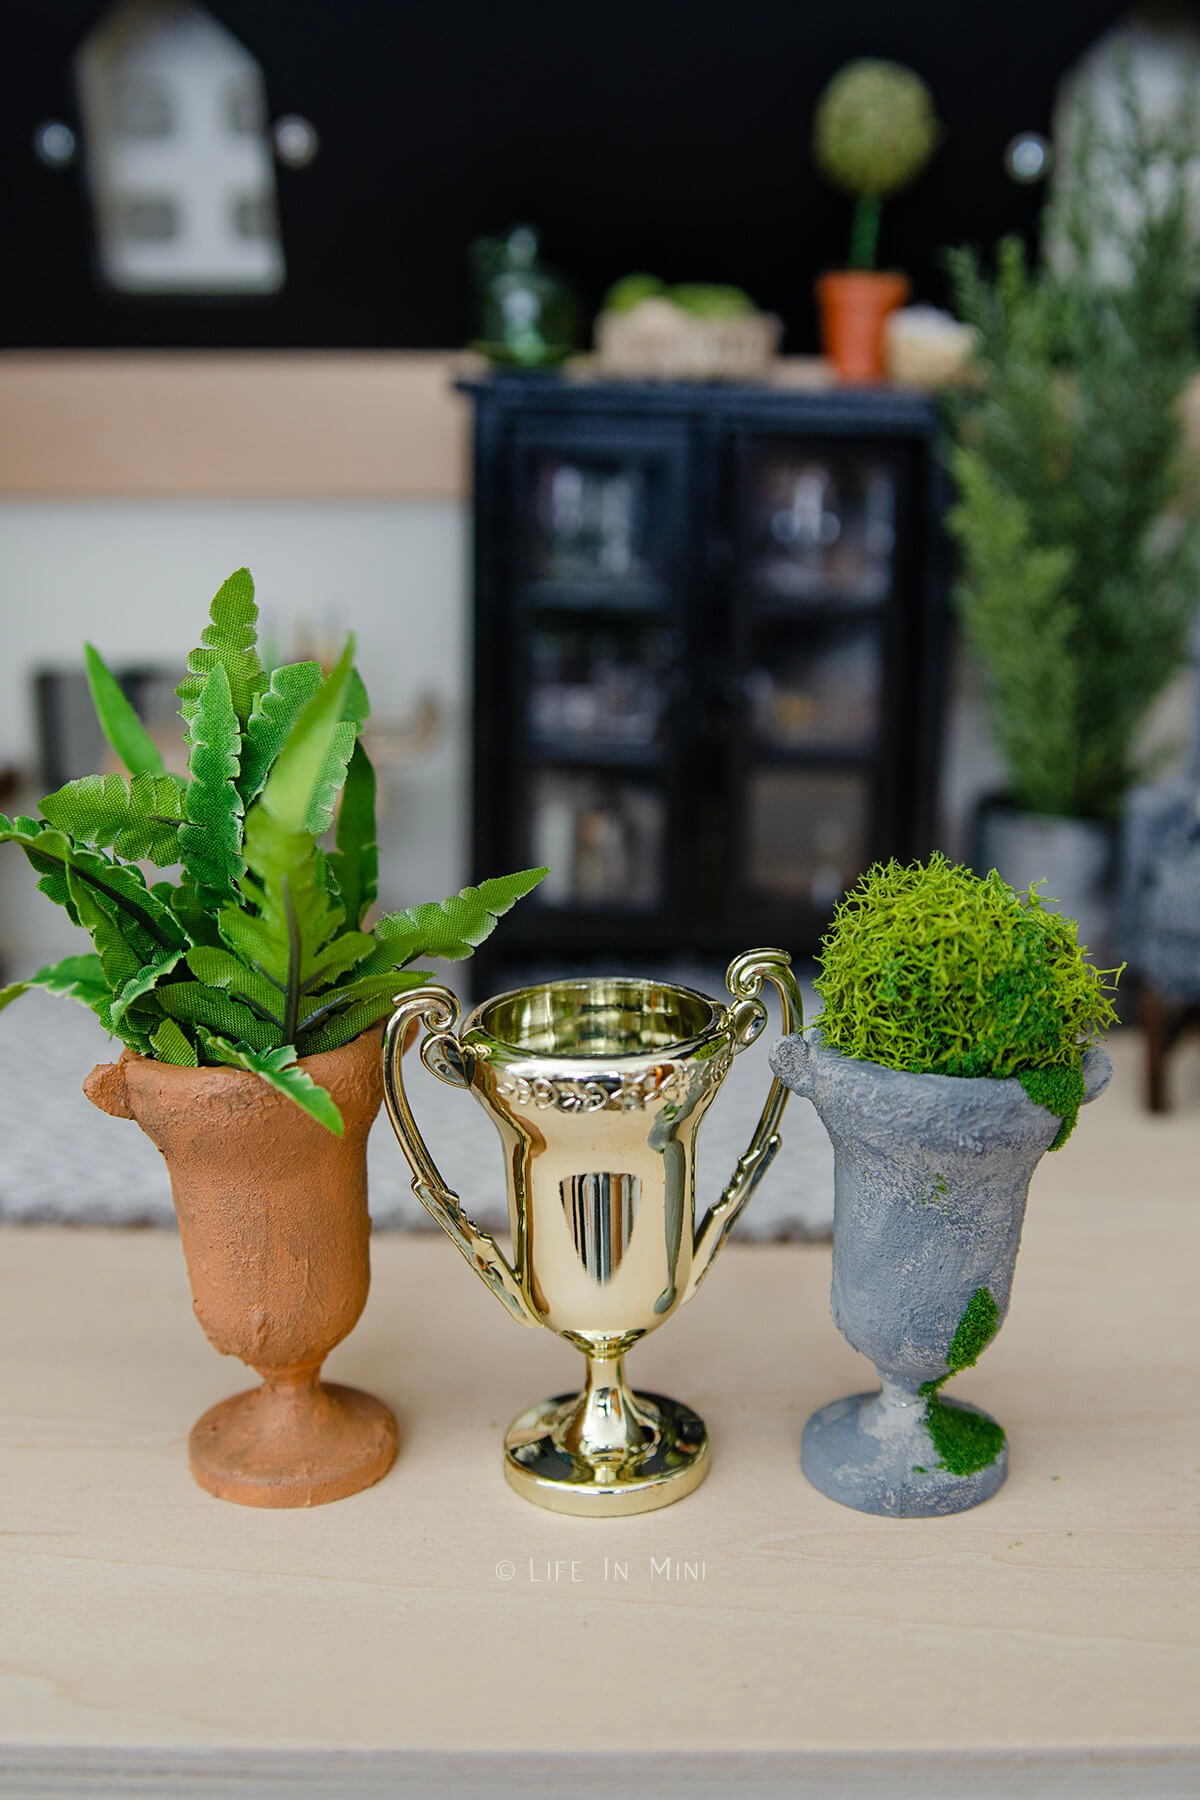
These mini trophy cups make AWESOME planters, but I did modify them a bit. They are pretty tall, so I shortened them.
- Snip off the big arms on either side.
- Cut the cup from underneath at the narrow point.
- Cut off some of support to shorten it then sand til smooth and even.
- Reattach the cup to the base with tacky glue.
- Paint as desired.
I did one in gray and one in terracotta, using the DIY chalk paint I shared before. Then you can use any kind of plants you want inside. I also added some moss flocking on the side of one of the pots.
They turned out so awesome that I realized that I need to do a tutorial on how I made the plants.
Mini fidget poppers
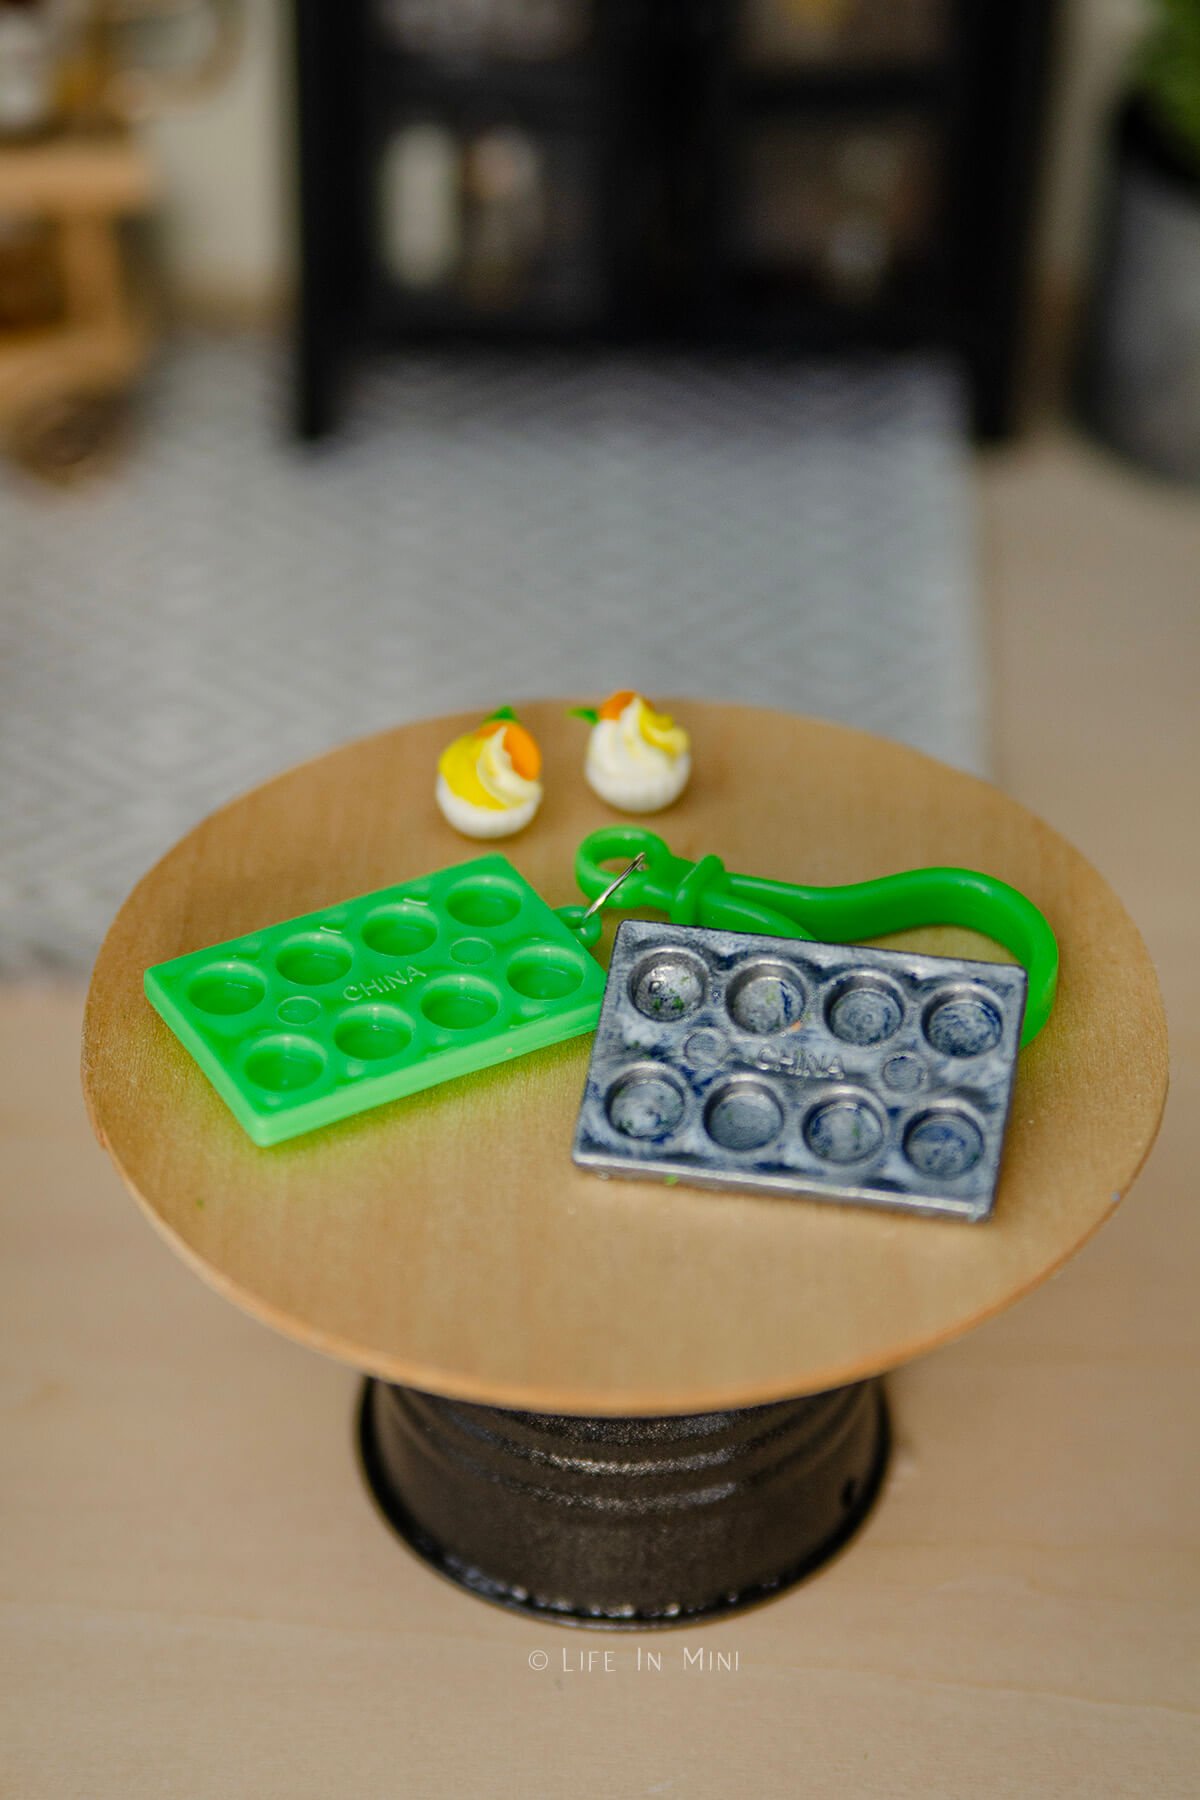
Those fidget poppers are available EVERYWHERE and come in a variety of sizes. I found these little keychain ones and immediately saw a mini cupcake pan. This was the simplest project.
Remove the keychain, paint the popper. Boom it’s done! It did take several coats of paint because it is more like rubber. I did sand it a little bit first.
Mini baby carriage
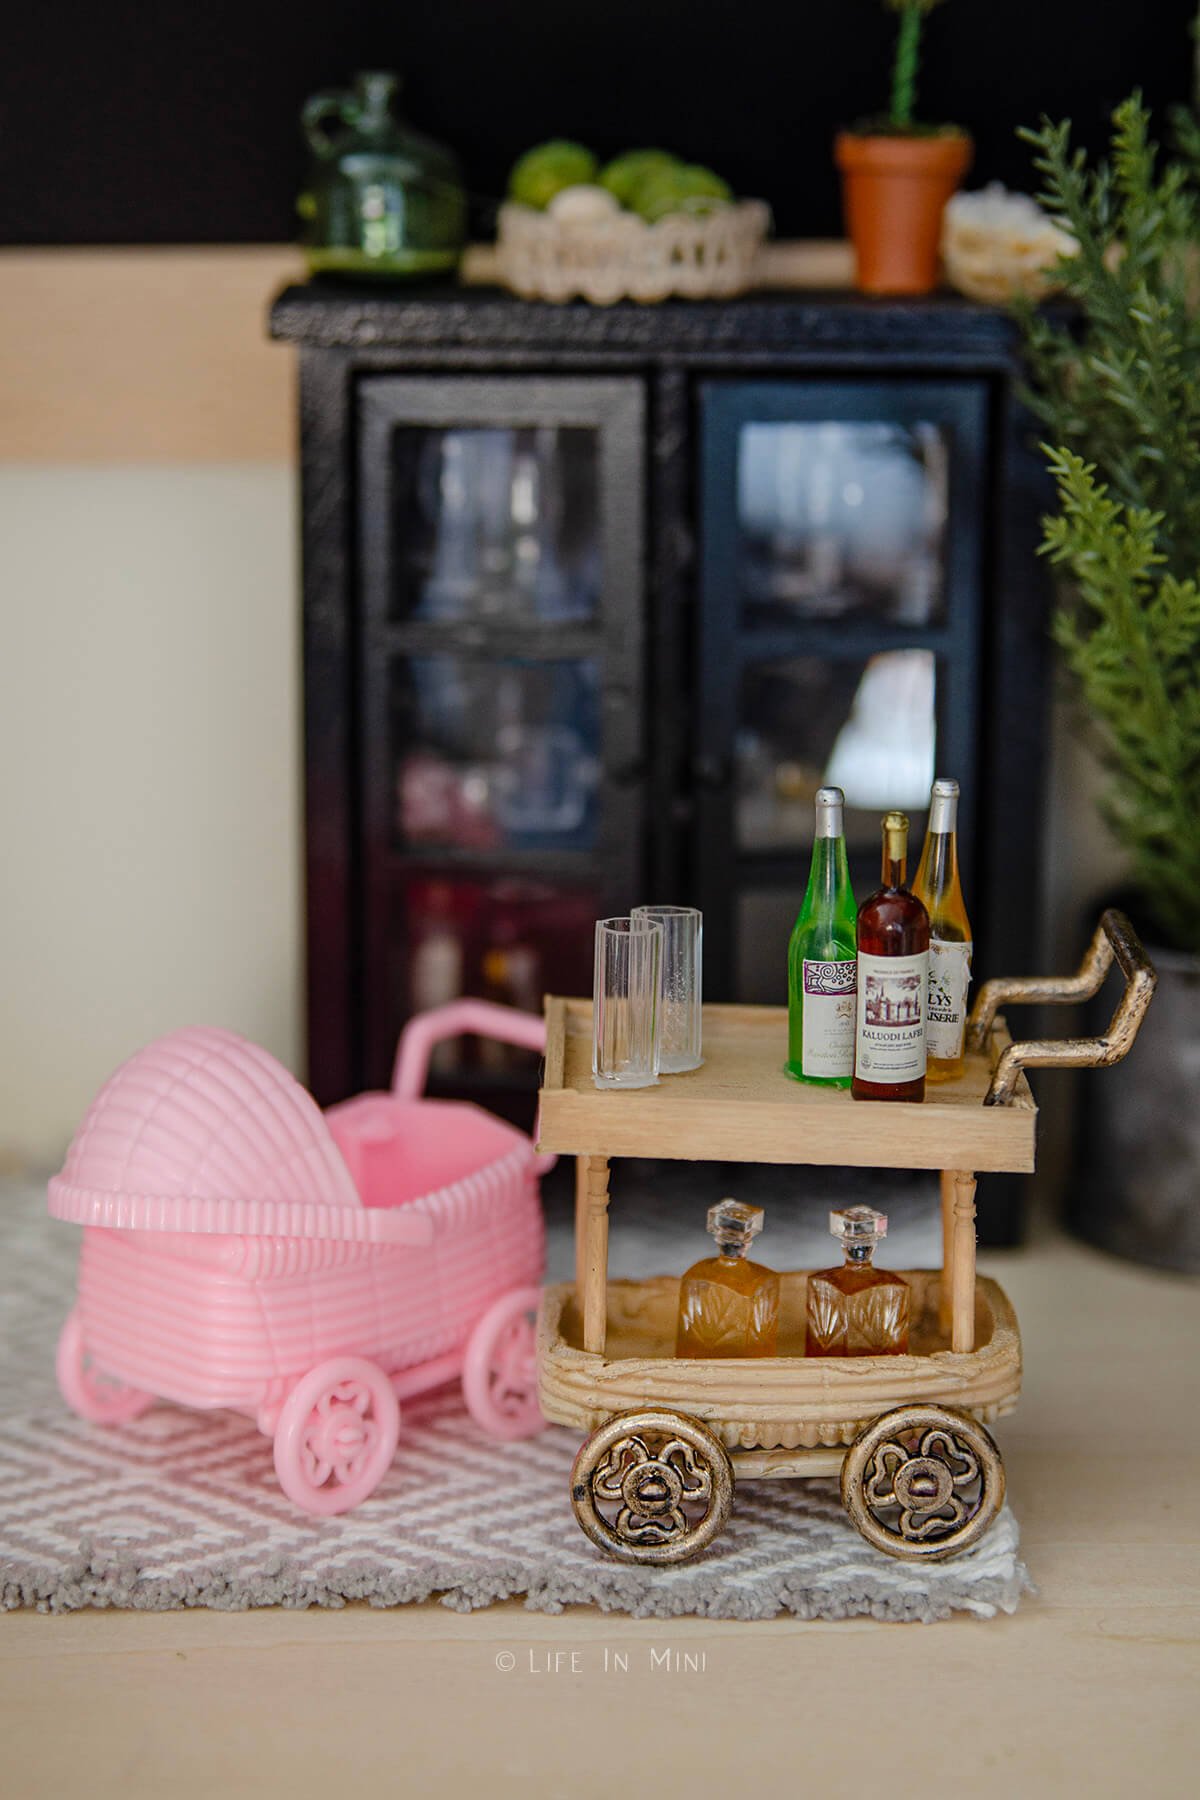
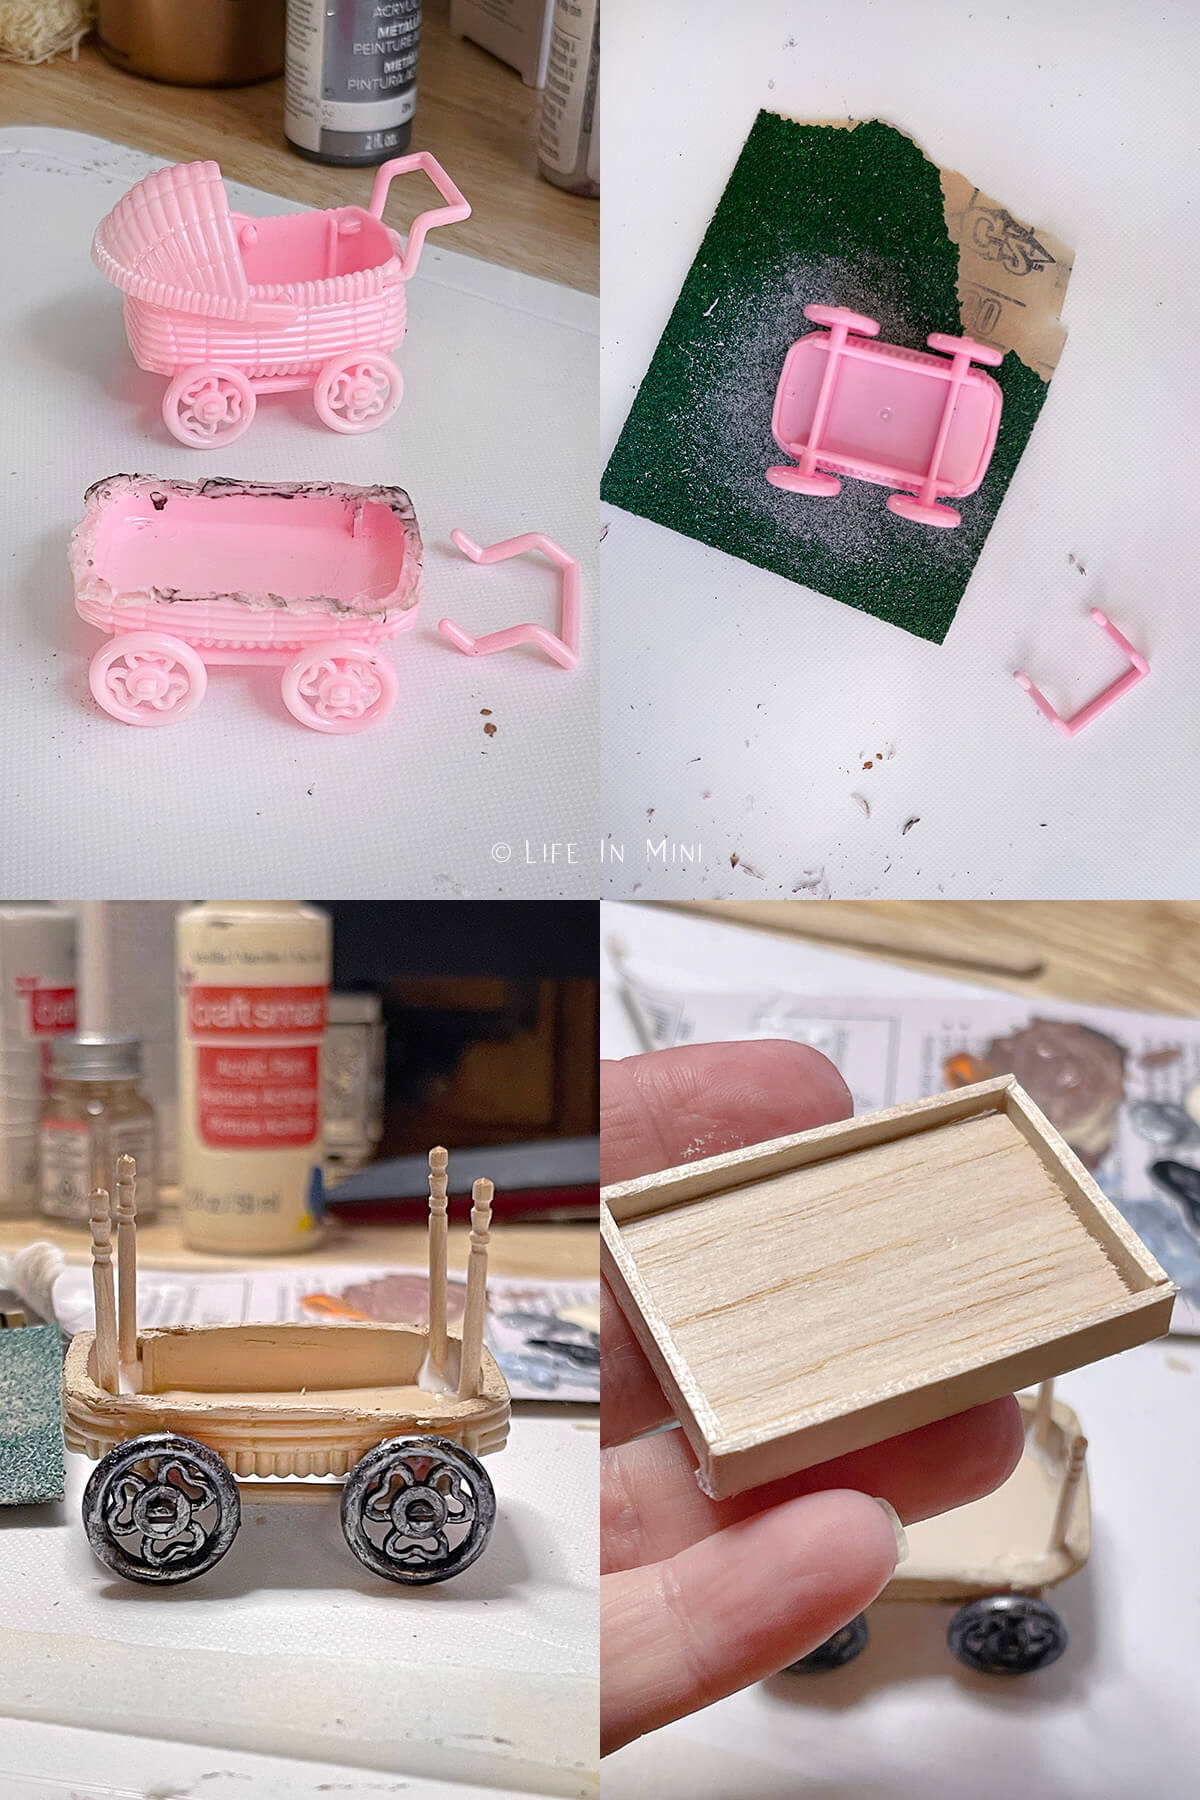
This was by far my most complicated project, but I am also so very proud of it. I made a mini bar cart using those cheapo plastic baby carriages you find for baby shower party favors. FYI cheaper in the store than online or Amazon.
- Remove the hood.
- Heat your blade and cut about half of the basket off. This can take awhile and DON’T burn yourself. And if there are fumes from the melting plastic, wear a mask.
- Save the carriage handle and discard the rest of the cut basket.
- Sand the bottom half of the basket (the part with the wheels) until smooth and even.
- Paint the wheels the color you like, then paint the lower basket. I wanted mine to look like rattan and bamboo.
- You will need 4 toothpicks cut to desired height, and to make a small rectangle box for the top of the bar cart. I used what scrap balsa wood I had on hand. Paint these before gluing.
- Glue the 4 toothpicks upright in the 4 corners of your bottom basket. Once that dries, add dabs of glue on top of each toothpick and place wood box over it.
- Paint the carriage handle the color you like, then glue to the box.
You can use the baby carriage as a well, baby carriage, too! The wheels are great for anything you want to make that needs wheels like a weber grill or pull toys on wheels.
I could have done a better job cutting the plastic. You can also use a hot blade and press it on cut edges to soften them a bit. I also debated with myself on whether I should have put some hemp rope over the top of the cut baby carriage to hide my messy work.
I will leave all those options for you to decide.
Mini baby bottles
Those mini plastic baby bottles can also be found in the baby shower section. You can use them as baby bottles, of course, but also for a number of other projects.
I used my x-acto to saw off the nipple top, added a drop of glue on top of parchment paper and placed the cut plastic over the glue. Let it dry. Now you have easy drinking glasses.
I also made champagne flutes using earring backs and a little bead. You will need the bullet earring backs WITH the plastic disc behind it. I used some masking tape to help secure the pieces while the glue dried.
Candelabra cake topper
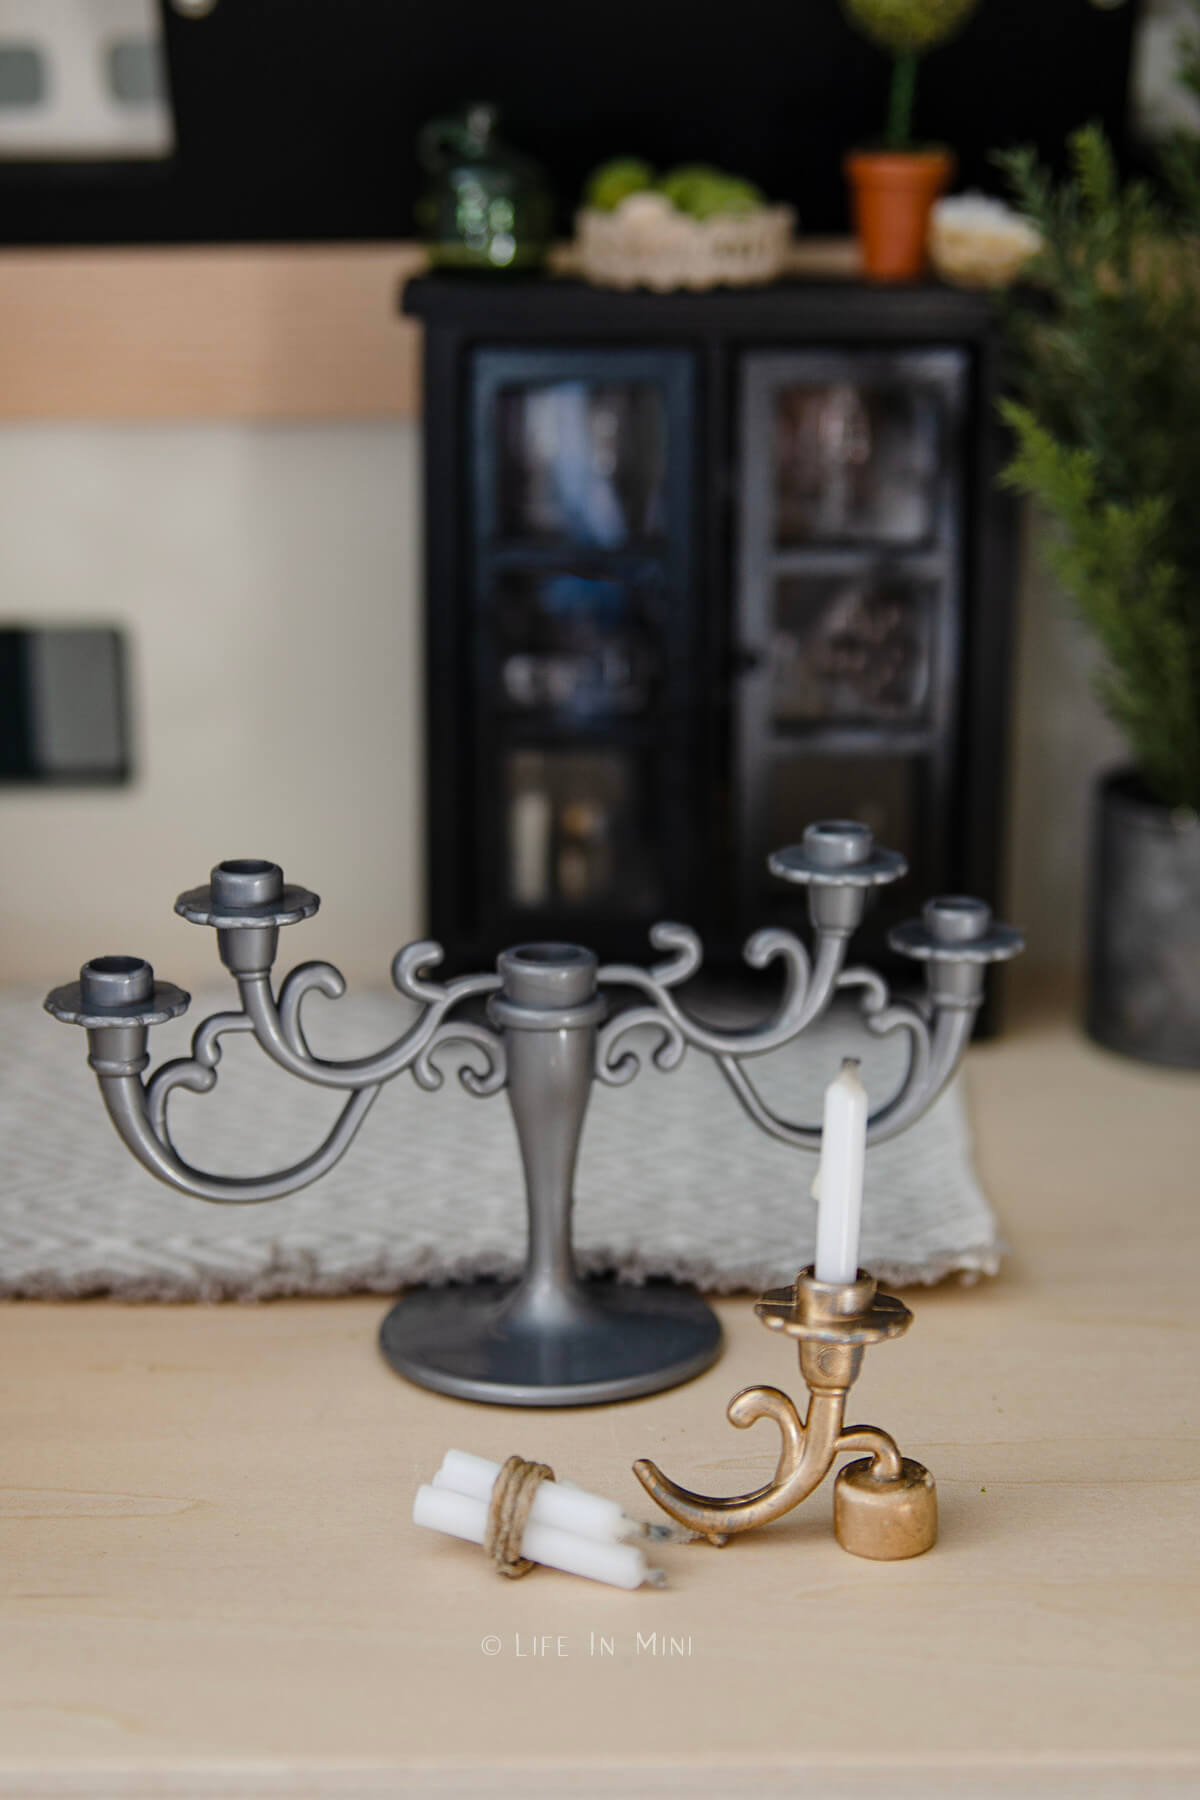
Ok, so these are way cheaper at the dollar store than amazon, but you can see what it was I used. Some mini makers used these to make those big candelabras that fit in a fireplace.
I cut one scroll off and thought it would look great as a wall sconce, especially for a medieval castle or Victorian house. I found a small wood bead and glued it so it became a fun candlestick for the table.
I also found some skinny candles at the dollar store. They are the perfect scale for miniatures, especially if you don’t want to make miniature candles.
Floating Blow Pipe
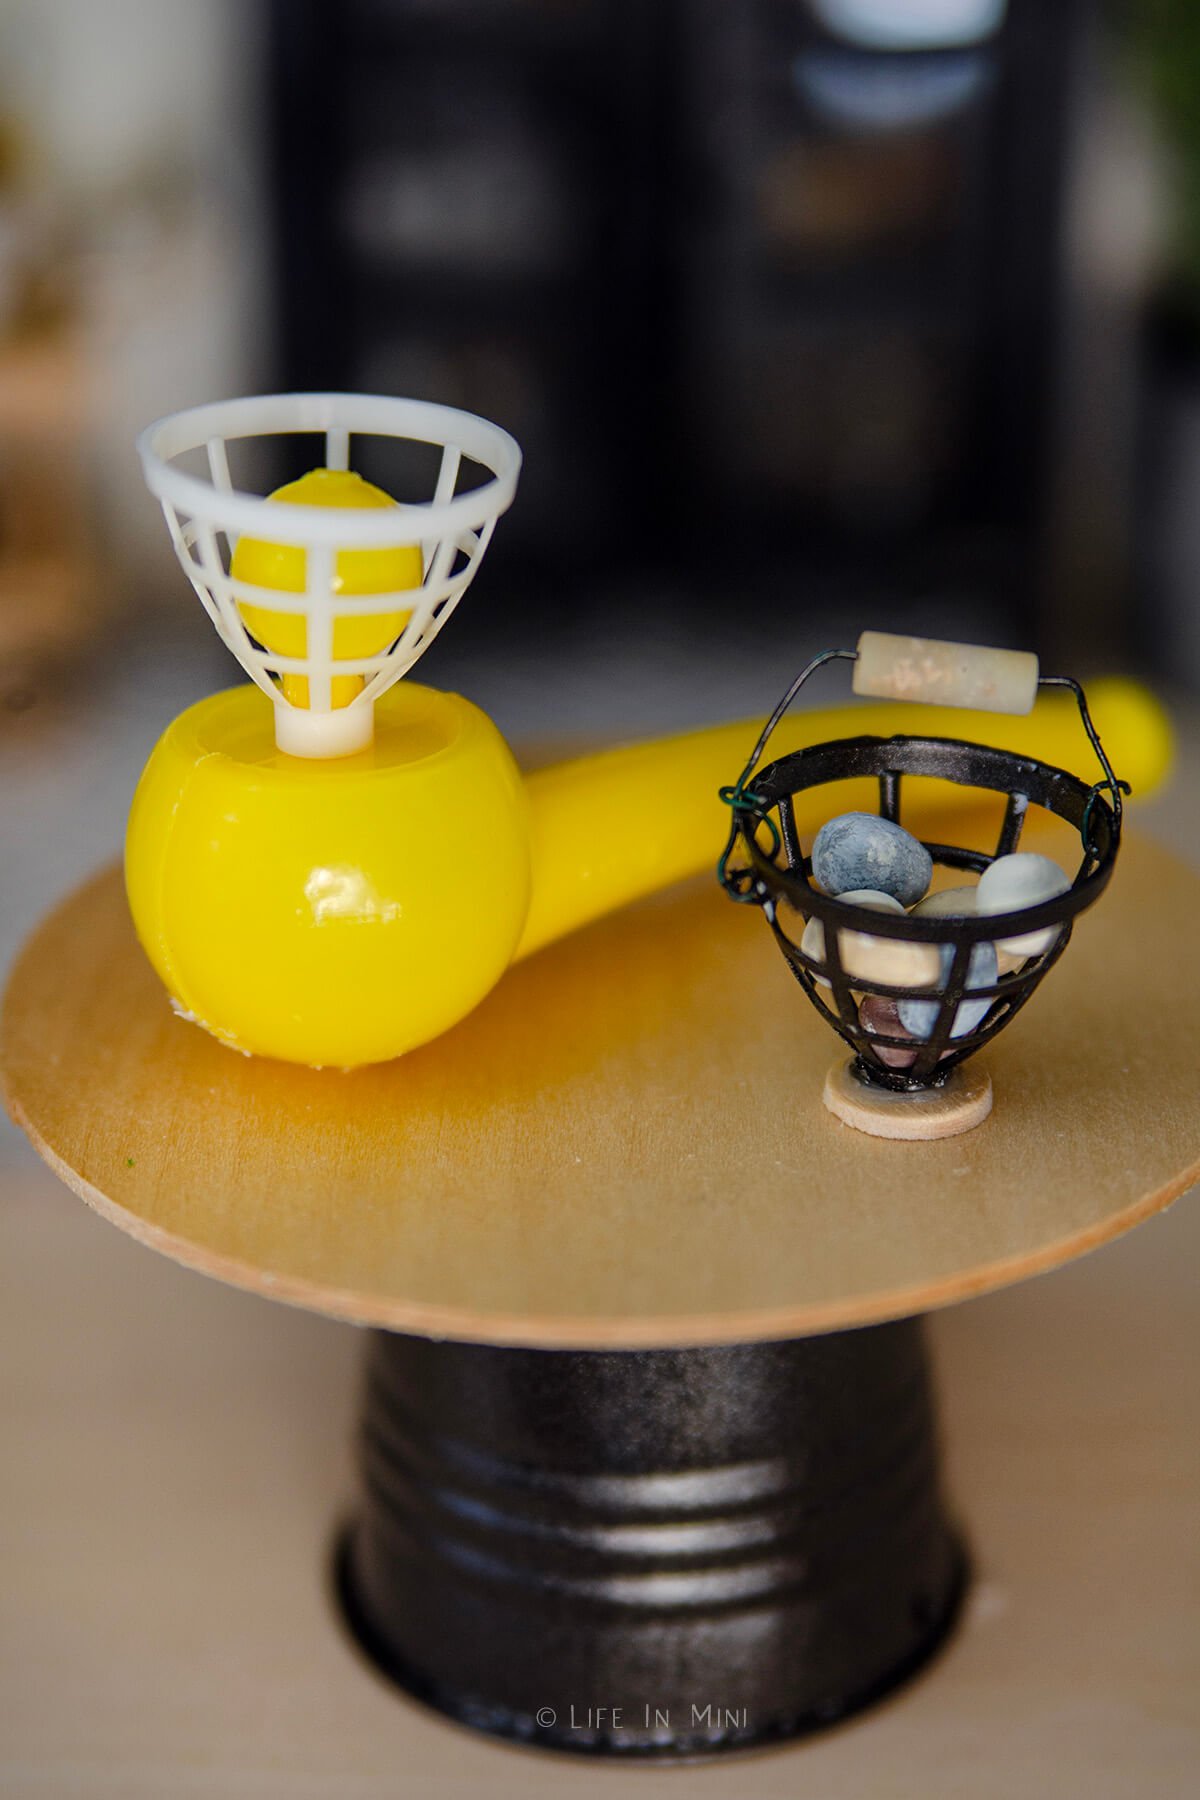
I won’t lie. I bought these floating blow pipes for the tiny basket. I did get 4 for $1.25!
You can use those little baskets for a number of different projects like a hanging basket for the kitchen or to hold a plant. I made a little egg basket. I cut the bottom off then added some glue to fill the small hole.
After painting it all black, I added a wire handle, using a small cylindrical bead. It was a little wobbly so I glued a small wood round and it was perfect. I made the eggs using air dry clay and painted them different colors with acrylic paints.
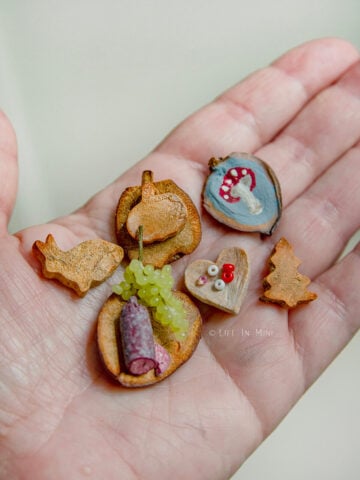
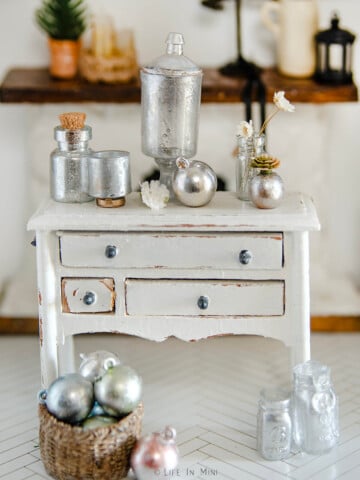
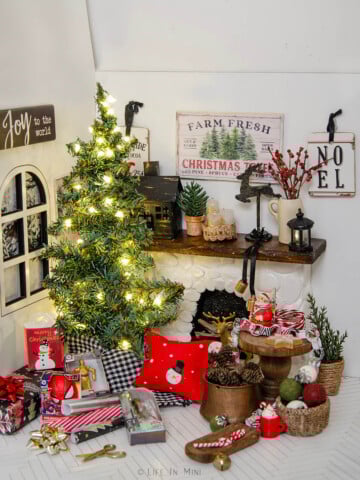
Mini gift boxes
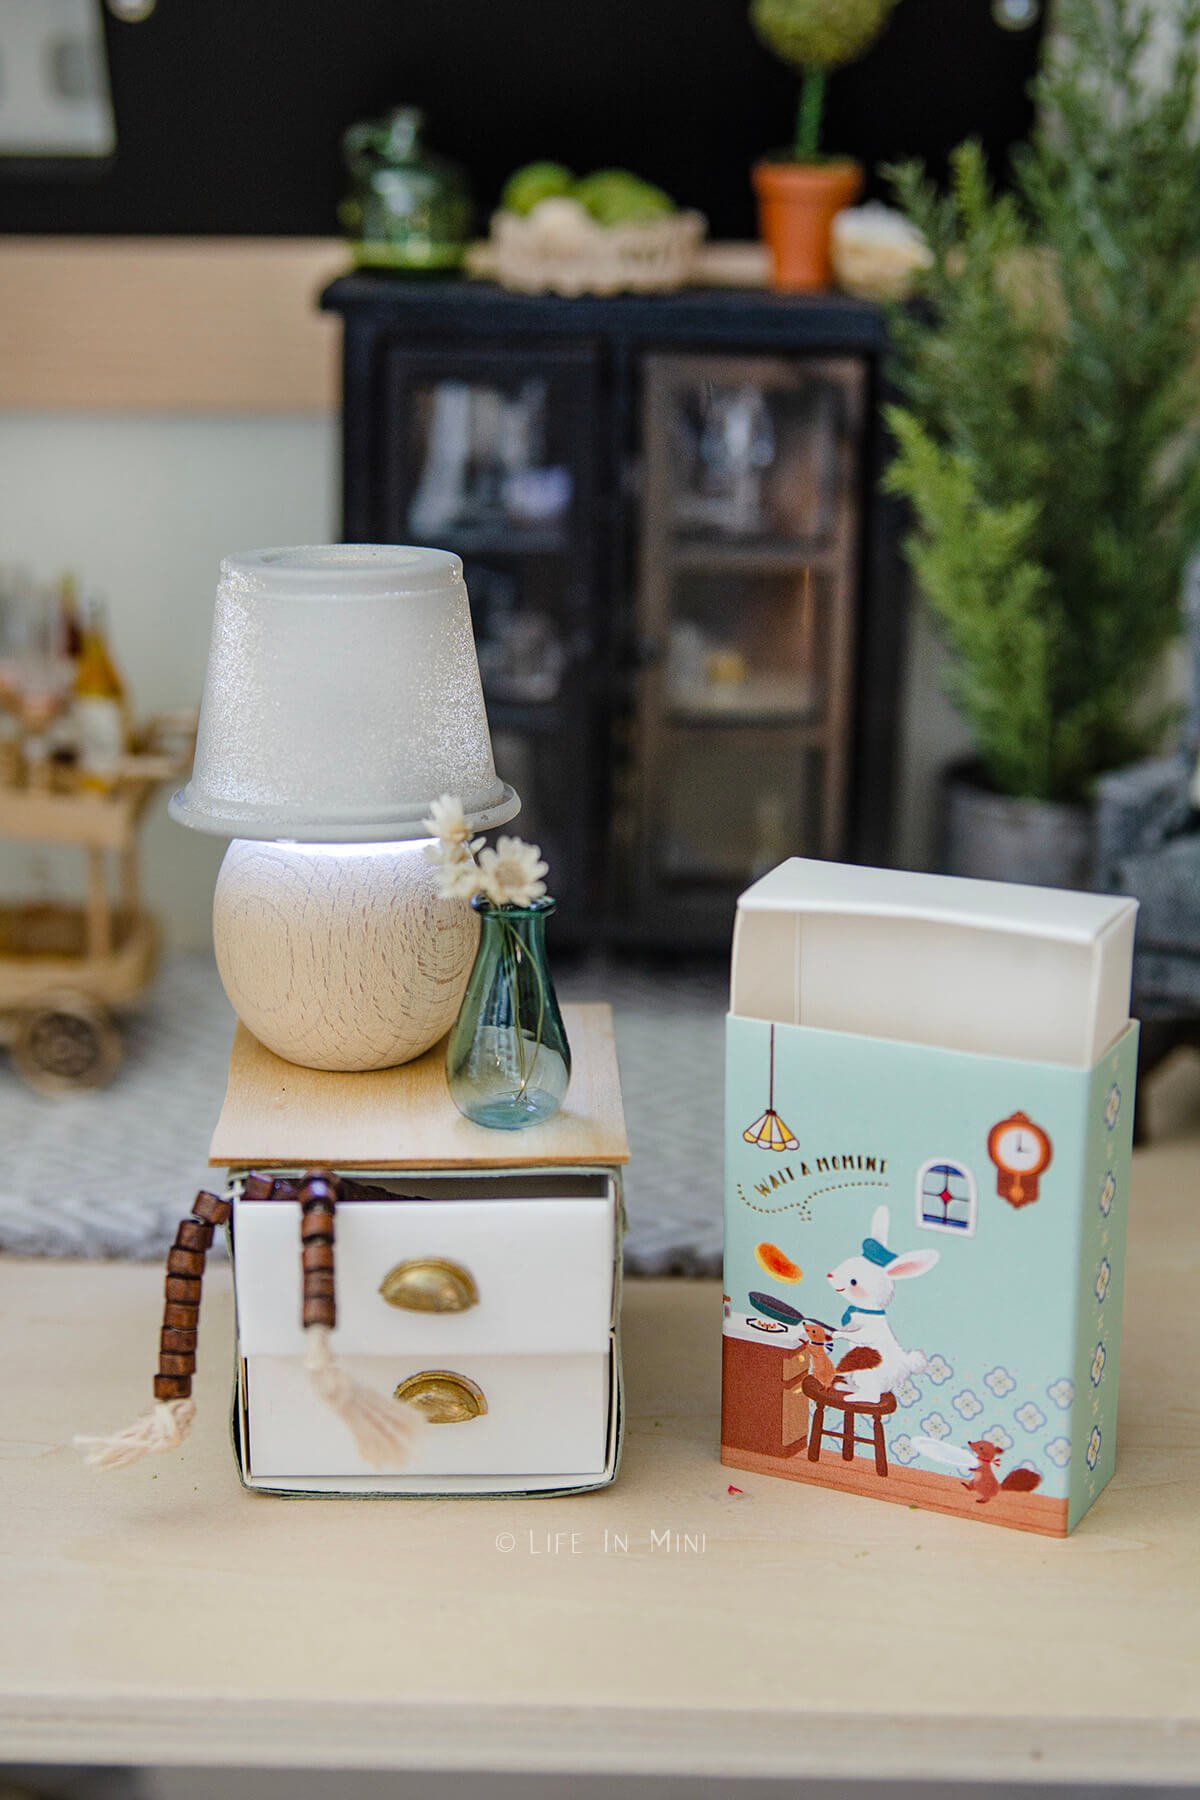
I found these cute little matchbox gift boxes at Daiso and made a small dresser with drawers with it. They are slightly bigger than matchboxes, but you do the same thing with them.
I glued two together and then wrapped it thick scrapbook paper. I added a wood top and it was done!
Mini buckets
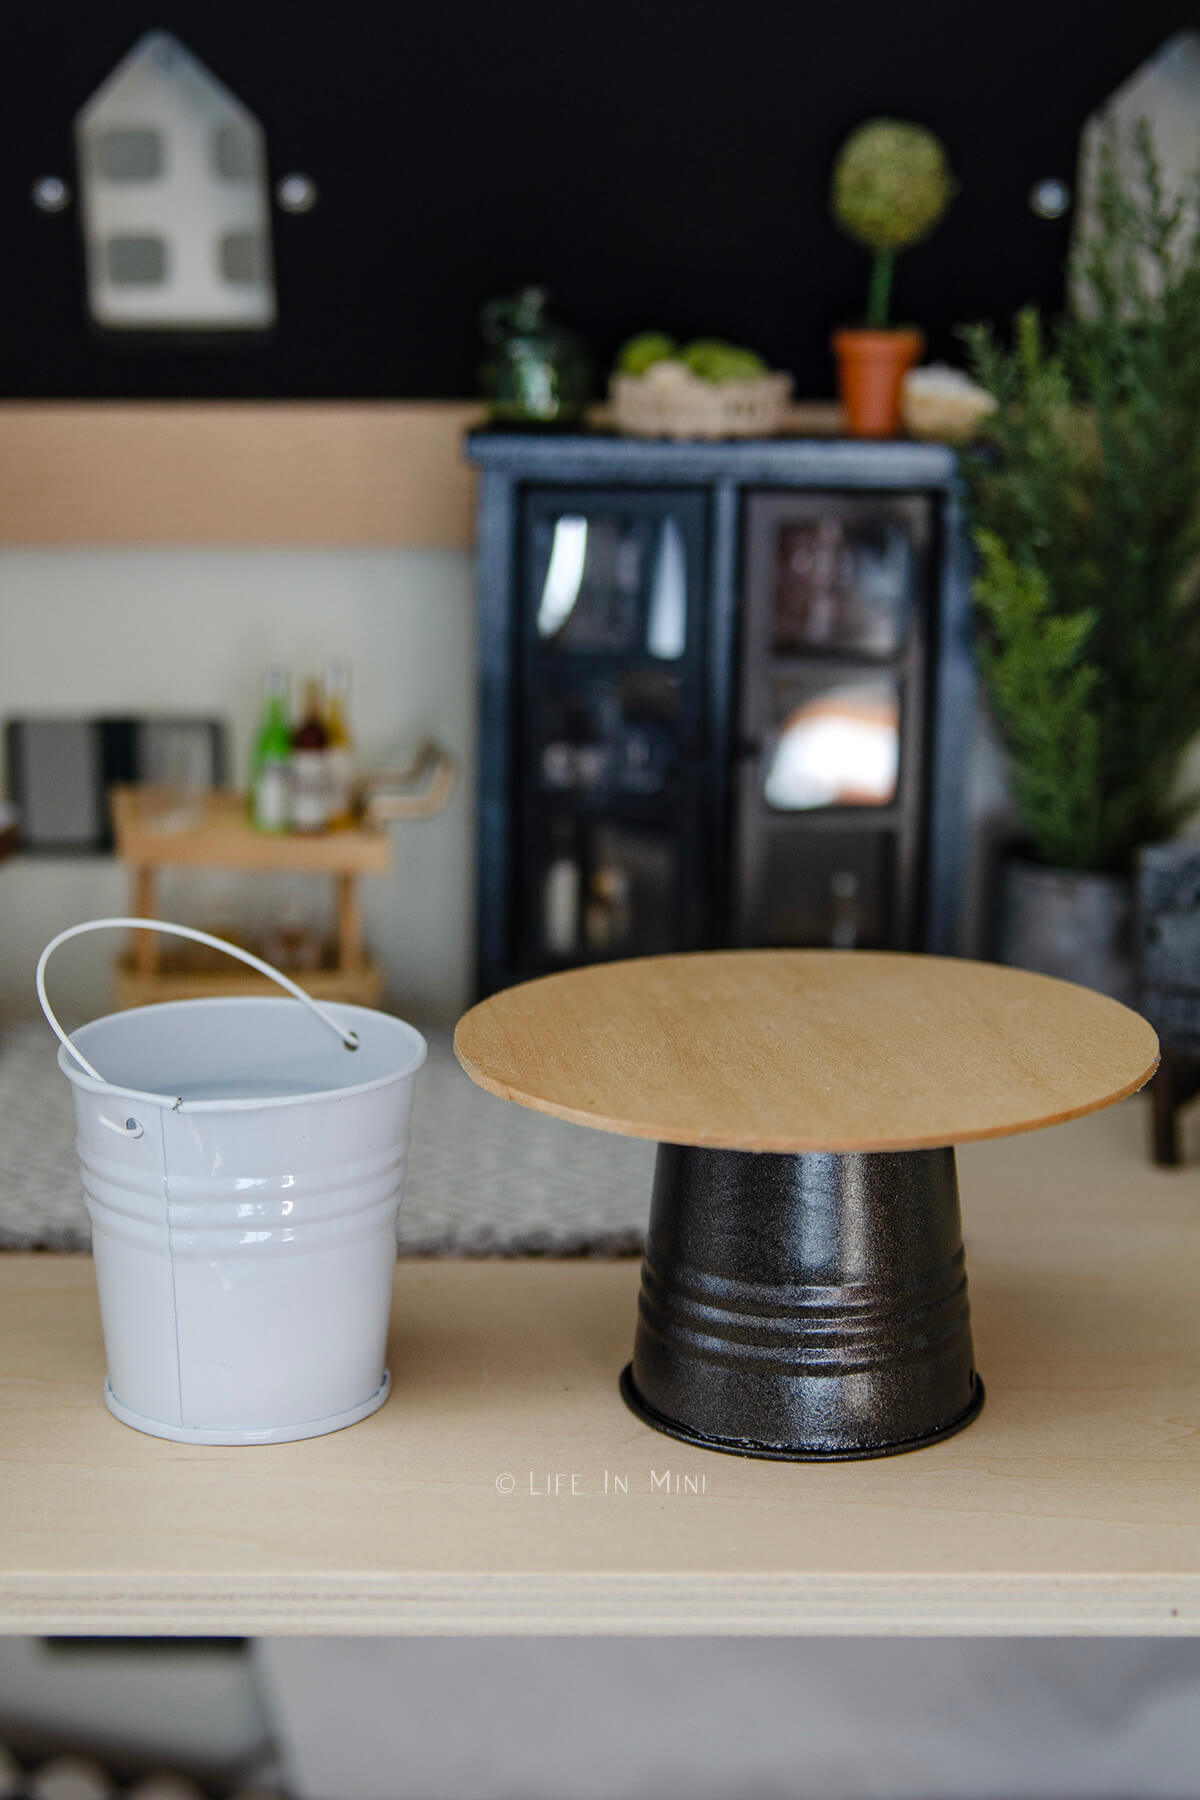
Those little mini metal buckets are used to hold candies for weddings, but they have many uses in the mini world. The obvious project is to use them as plant holders. But since I already did a plant project, I tried something different.
I painted it black, used my Cricut Maker to cut a 4-inch round piece from basswood and glued it to make small table. You could also use an acrylic round, too, to mimic a glass table.
Project tips and FAQs
Sometimes these party favors give you immediate ideas and inspiration to convert them to miniatures. Other times, you have to do a little more thinking. So I suggest looking at the general shape and not its purpose.
Flip the object around, turn it upside down – maybe it resembles something else this way?
As I said before, these items are cheap in price and in structure. In other words, they break easily. While cutting up the baby carriage for another idea, I ended up cracking the piece in half and ruining it. Luckily, you get 3-4 (sometimes more) in each bag. And for me, each bag cost about $1.25, so these are very inexpensive and easy to replace.
So be patient and use a gentle hand when cutting and working these things. And if it breaks, maybe it be repaired with a bit of glue and paint?
If you are enjoying my blog, why not sign up for my newsletter so you won’t miss out on the mini adventures!

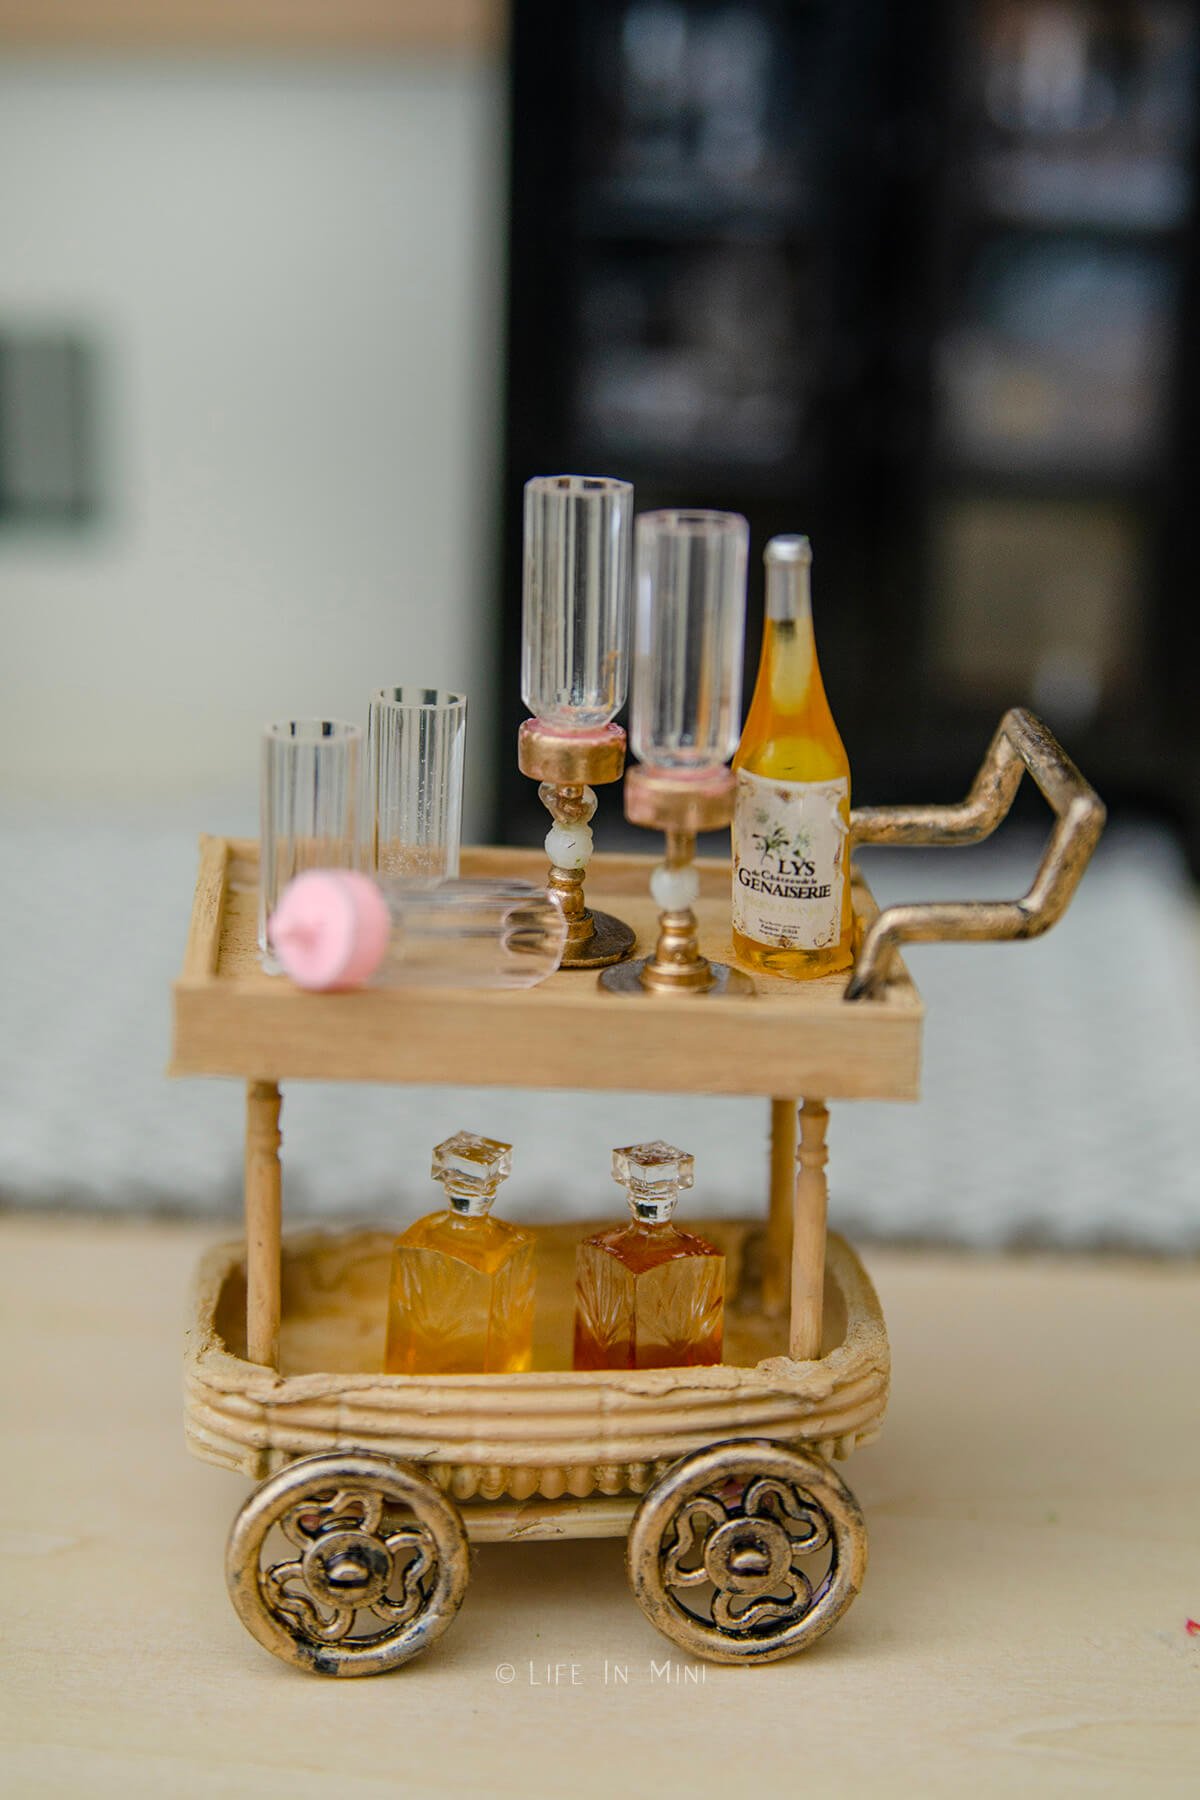
How to make a miniature bar cart
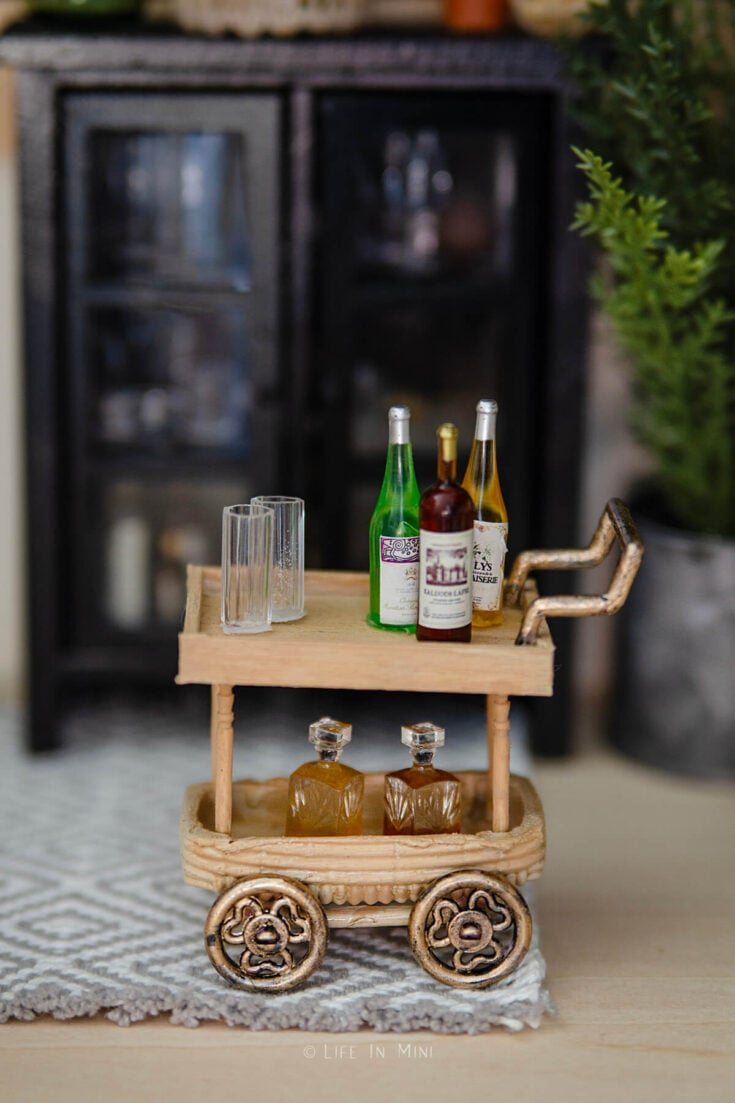
You can make a beautiful miniature bar cart or trolly using an inexpensive plastic baby carriage used as baby shower party favors! With a few modifications, paint and some scrap wood you don't have to break the bank to make it.
Materials
- Plastic baby carriage party favor
- Paints
- Aleen’s tacky glue
- Basswood
- 4 wood toothpicks
Tools
- X-acto blade
- Lighter
- Sand paper
- Paint brushes
- Masking tape
Instructions
- Remove the carriage hood. You won't need it for this project.
- Heat your blade and carefully cut about half of the basket off. This can take awhile so take your time and DON'T burn yourself. If there are fumes from the melting plastic, wear a mask.
- Remove the carriage handle and save it. You can discard the rest of the top part of the basket you cut off.
- Sand the bottom half of the basket (the part with the wheels) until smooth and even.
- Paint the wheels the color you like. Metallic paints work great here.
- When the wheels are dry, paint the lower basket. I wanted mine to look like rattan and bamboo so I used a combination of beige, brown and yellow to mimic this.
- Cut the toothpicks to your desired height. Mine are XX tall.
- You will need to make a small box for the top of the bar cart. For mine, I cut 4 sides and a bottom using these dimensions:
- Once the wood is cut and sanded smooth, paint them and the toothpicks your desired color.
- When the wood is dry, add four dabs of glue in each corner of the bottom basket and place the toothpicks upright. Make sure they are standing straight while the glue sets.
- Once dried, add dabs of glue on top of each toothpick and place the painted wood box over it. Place something mildly heavy in the basket to press it into the glue and dry.
- Paint the carriage handle you saved to the color you like. Once dried, glue it to the side of the top box, adding something tall under it to prop it while it dries.
Notes
Cutting the plastic baby carriage is the hardest part of this project. Be careful while heating up your blade and cutting it. You will continuously heat the blade and make a few cuts and heat it again and make more cuts.
I could have done a better job cutting the plastic. You can also use a hot blade and press it on cut edges to soften them a bit. I also debated with myself on whether I should have put some hemp rope over the top of the cut baby carriage to hide my messy work.
PS If you try this craft, why not leave a star rating in the direction card right below and/or a review in the comment section further down the page? I always appreciate your feedback.
You can also follow me on Pinterest, Facebook or Instagram. Sign up for my eMail list, too!
Written by Laura Bashar
I’m a food blogger and cookbook author that loves miniatures and crafting. I started this blog to share my passion for minis, including tutorials and free printables.
Donna Morrison says
I LOVE your amazing, creative mind!!! I get so excited when I see your posting in my email!!! You give me confidence to try my hand at your tutorials even though my shaky hands don’t make my projects as nice as yours it still brings me Joy!!! Before I saw your tutorials I would attempt something then feel like a failure and give up. It also wasn’t fun at all having pressure to achieve perfect results so I understand about feeling discouraged. Because of you I have fun making my little minis although there are some times I want to scowl at a piece that will not cooperate, walk away then come back to it later. Ha! Ha!
Hang in there and give yourself a break and we will wait till we see your next posting. It is more important for your adoring fans so you don’t have fun or get burned out. Even writers get writers block so be good to yourself! Thank you for all you do!
HUGS!