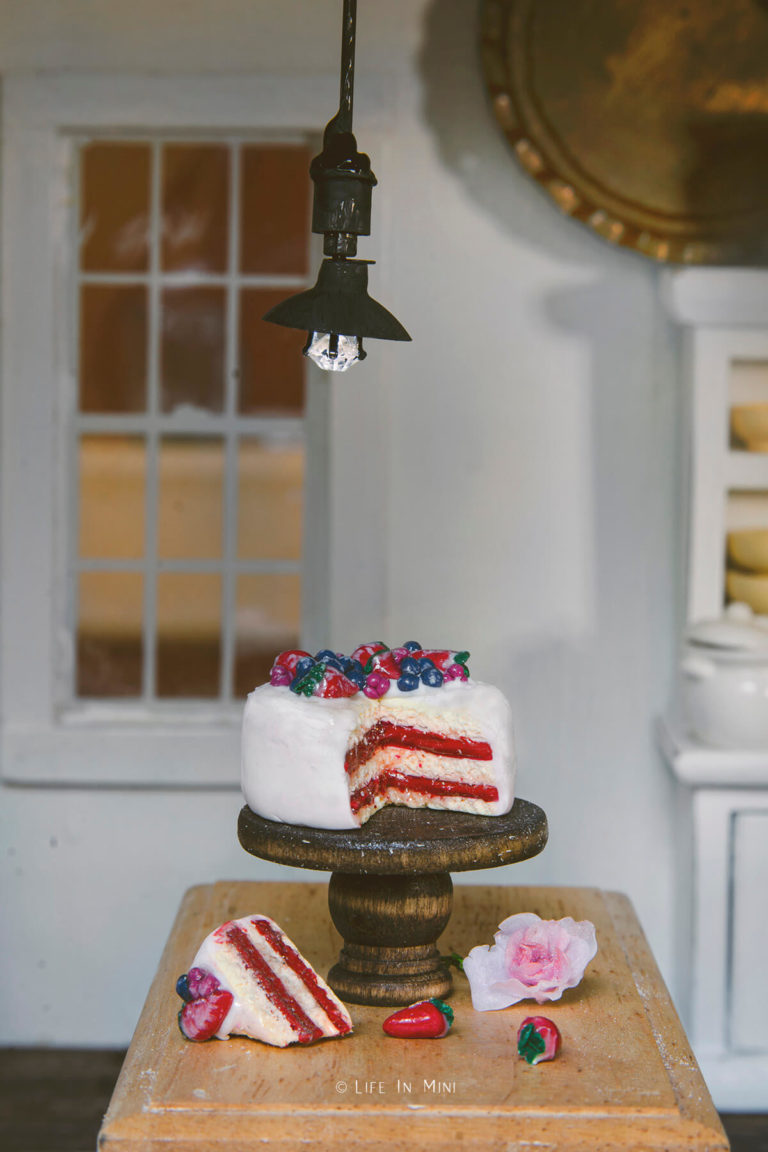
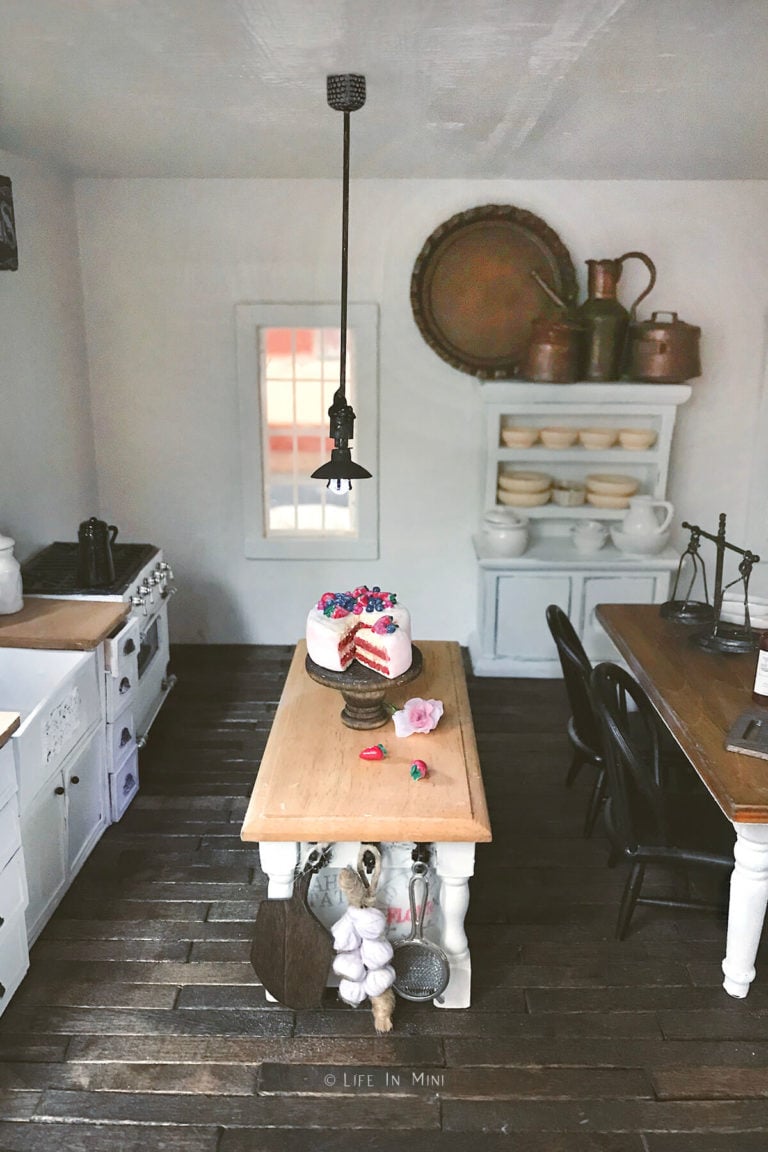
Dollhouse lighting can be crazy expensive. These little LED farmhouse lights are easy to make and easy on the wallet, too, thanks to LED earrings.
Lighting is one of those big projects that frustrate a lot of miniaturists. When I was a kid, my dad and I drew out plans and added copper tape wiring to my entire dollhouse. This was the early 80s. Not many pretty choices in dollhouse lighting.
Plus, copper tape has lots of issues and doesn’t hold up very well over time. I ended up pulling it all out when I rehabbed my old dollhouse 30 years later. Traditional wiring takes more time and effort, but it feels like you need a PhD to do it yourself.
Many people prefer to light their dollhouses with battery operated lights. You don’t have to light up the whole house to use them, but man are they expensive. Some miniature lights cost as much as their full size counterparts – even more!
There are many fabulous tutorials on making your own dollhouse lights on Facebook and Instagram. I learned about LED earrings and decided to make some cute farmhouse pendant lights with them for my mini kitchen.
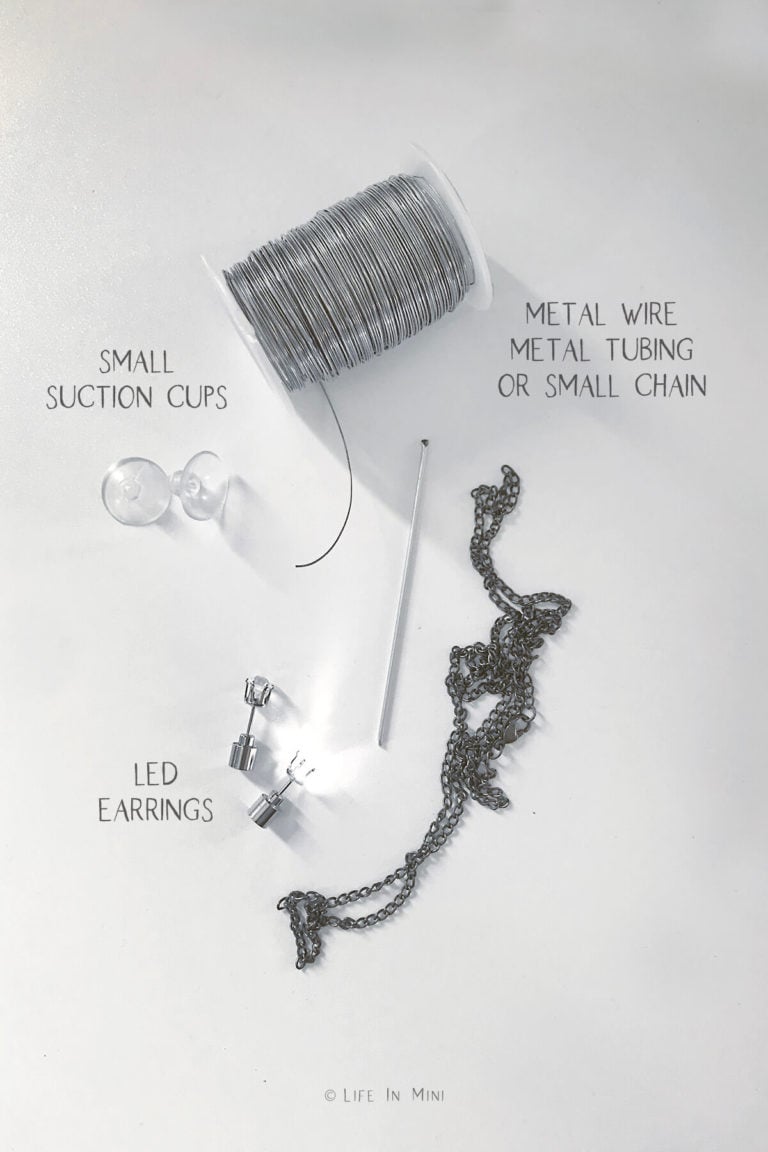
Supplies you need
This post contains some affiliate links for your convenience (which means if you make a purchase after clicking a link I will earn a small commission but it won’t cost you a penny more)! Read my full disclosure policy.
- Small suction cups: You probably have some of these suction cups in your junk drawer. But just in case you don’t, you can purchase them online. I used the small size, 18mm/0.7″.
- LED earrings: These LED earrings are pretty inexpensive online. You can buy just one pair or even cheaper if you buy them in multiples. They also come in different colors. Some of the white lights are a bit on the blue side, which you can make warmer by coloring the crystal with a little yellow sharpie.
- Metal tubing: I used some scrap metal tubing to hang my farmhouse pendant. It was a bit short, but worked just fine. You can also use a bamboo skewer, metal wire, baker’s twine or a small chain.
- Adhesive putty: I wasn’t sure if I would like the lights when I hung them so I used some of my adhesive putty stickers to hang them. These lights are not heavy and the putty holds them just fine. You can also use hot glue or any other adhesive you prefer. For the putty stickers, I had to cut them as the circles were a bit large.
- Other supplies: black paint, paint brush, scissors/x-acto, hot glue
Step-by-step directions
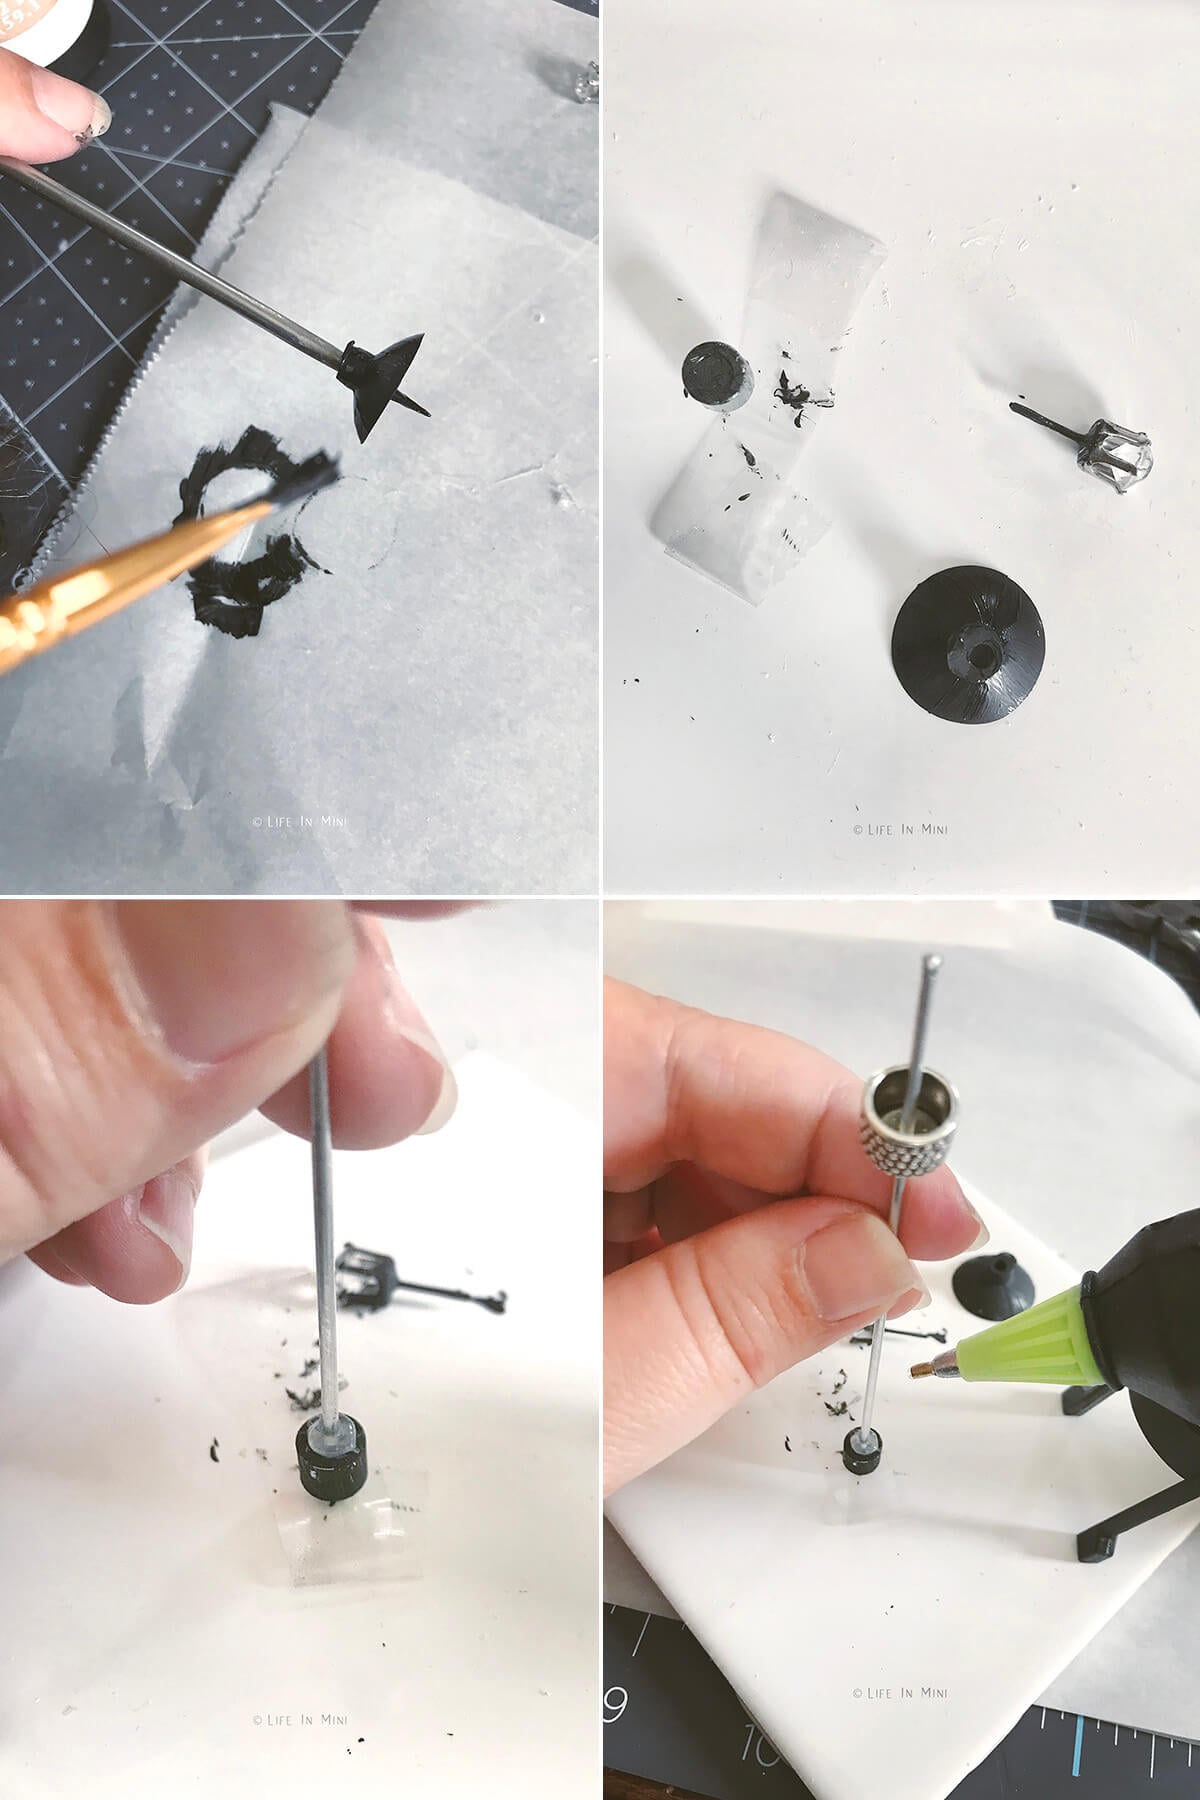
- Paint the suction cup. Remove the top end of the suction cup. You want the earring to fit in it with it able to open and close and turn the light on and off. Paint the suction cup black, inside and out.
- Paint the earring. Paint the metal earring back and the metal around the LED earring stud black.
- Glue the rod. I used a small metal tubing to hang my light. You can also use a bamboo stick, metal wire, twine or a small chain. Whatever you do use, hot glue one end to the back of the earring back.
- Add embellishments. I used a bead for my ceiling mount and needed to insert it thru the tube before gluing the tube to the earring back. You can also affix the ceiling mount to the top end of your tube with hot glue.
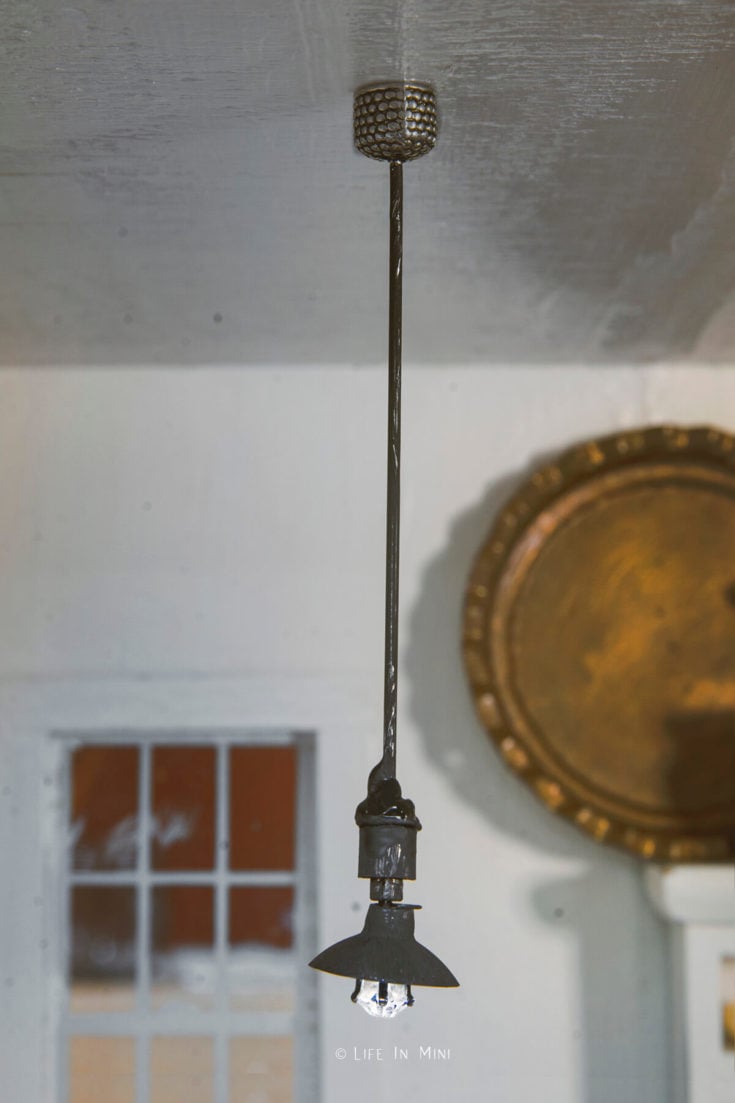
- Paint and finish. Paint the tube and ceiling mount black. Once the paint is dry, attach your miniature pendant where you want using glue or sticky adhesive putty. You can turn your light on and off by pressing the earring in and out of its backing.
Project tips and FAQs
If you do not like the way the crystal looks, you can attach a small glass globe over it. You can also frost the glass globe with spray.
You can also faux paint the dollhouse light rust. This would be a combination of brown and black specs.
If your white light is a bit blue, you can paint the crystal with a little yellow using a yellow sharpie or glass paint.
Many of these LED earrings have replaceable batteries. This will require you to remove the old battery from the back housing of the earring. Since everything is attaching with hot glue, it is easy to remove and reglue once the battery is replaced. These LEDs last a long time.
LED earrings last for about 20 hours. It is just another tool in your miniature hack arsenal and supplies. Balloon lights last longer, but are also larger.
If you are enjoying my blog, why not sign up for my newsletter so you won’t miss out on the mini adventures!
Dollhouse Lighting: Miniature Farmhouse Pendant
Dollhouse lighting can be crazy expensive. These little LED farmhouse lights are easy to make and easy on the wallet, too.
Materials
- 2 small suction cups
- 1 pair of LED earrings
- Metal tubing
- Adhesive putty
- Black paint
Tools
- Paint brush
- Scissors/xacto
- Hot glue
Instructions
- Remove the top end of each suction cup. You want the earring to fit in it with it able to open and close and turn the light on and off. Paint the suction cup black, inside and out.
- Paint the metal earring backs and the metal around each LED earring stud black.
- I used a small metal tubing to hang my light. You can also use a bamboo stick, metal wire, twine or a small chain. Whatever you do use, hot glue one end to the back of the earring back.
- I used a bead for my ceiling mount and needed to insert it thru the tube before gluing the tube to the earring back. You can also affix the ceiling mount to the top end of your tube with hot glue.
- Paint the tube and ceiling mount black. Once the paint is dry, attach your miniature pendant where you want using glue or sticky adhesive putty. You can turn your light on and off by pressing the earring in and out of its backing.
Notes
You can make one or more of these miniature pendant lights. You can also make a side wall mount with wood or metal.
PS If you try this craft, why not leave a star rating in the direction card right below and/or a review in the comment section further down the page? I always appreciate your feedback.
You can also follow me on Pinterest, Facebook or Instagram. Sign up for my eMail list, too!
Written by Laura Bashar
I’m a food blogger and cookbook author that loves miniatures and crafting. I started this blog to share my passion for minis, including tutorials and free printables.
Leave a Reply